I recently gave a presentations at the OpenStack Summit in Boston with the same title. You can find a video of the talk here: https://www.openstack.org/videos/boston-2017/dirty-clouds-done-dirt-cheap. This blog post will cover the same project, but it will go into a lot more detail, which I couldn’t cover during the presentation.
Just a heads up this post is long! I try to cover every step of the project with all the details I could remember. It probably would have made sense to split things up into multiple posts, but I wrote it in a single sitting and doing that felt weird. If you’re just looking for a quicker overview, I recommend watching the video of my talk instead.
The Project Scope
When I was in college I had a part time job as a sysadmin at a HPC research lab in the aerospace engineering department. In that role I was responsible for all aspects of the IT in the lab, from the workstations and servers to the HPC clusters. In that role I often had to deploy new software with no prior knowledge about it. I managed to muddle through most of the time by reading the official docs and frantically google searching when I encountered issues.
Since I started working on OpenStack I often think back to my work in college and wonder if I had been tasked with deploying an OpenStack cloud back then would I have been able to? As a naive college student who had no knowledge of OpenStack would I have been successful in trying to deploy OpenStack by myself? Since I had no knowledge of configuration management (like puppet or chef) back then I would have gone about it by installing everything by hand. Basically the open question from that idea is how hard is it actually to install OpenStack by hand using the documentation and google searches?
Aside from the interesting thought exercise I also have wanted a small cloud at home for a couple of reasons. I maintain a number of servers at home that run a bunch of critical infrastructure. For some time I’ve wanted to virtualize my home infrastructure mainly just for the increased flexibility and potential reliability improvements. Running things off a residential ISP and power isn’t the best way to run a server with a decent uptime. Besides virtualizing some of my servers it would be nice to have the extra resources for my upstream OpenStack development, I often do not have the resources available to me for running devstack or integration tests locally and have to rely on upstream testing.
So after the Ocata release I decided to combine these 2 ideas and build myself a small cloud at home. I would do it by hand (ie no automation or config management) to test out how hard it would be. I set myself a strict budget of $1500 USD (the rough cost of my first desktop computer in middle school, an IBM Netvista A30p that I bought with my Bar Mitzvah money) to acquire hardware. This was mostly just a fun project for me so I didn’t want to spend an obscene amount of money. $1500 USD is still a lot of money, but it seemed like a reasonable amount for the project.
However, I decided to take things a step further than I originally planned and build the cloud using the release tarballs from http://tarballs.openstack.org/. My reasoning behind this was to test out how hard it would be to take the raw code we release as a community and turn that into a working cloud. It basically invalidated the project as a test for my thought exercise of deploying the cloud if I was back in college (since I definitely would have just used my Linux distro’s packages back then) but it made the exercise more relevant for me personally as an upstream OpenStack developer. It would give me insight as to where what we’re there are gaps in our released code and how we could start to fix them.
Building the Cloud
Acquiring the Hardware
The first step for building the cloud was acquiring the hardware. I had a very tight budget and it basically precluded buying anything new. The cheapest servers you can buy from a major vendor would pretty much eat up my budget for a single machine. I also considered building a bunch of cheap desktops for the project and putting those together as a cloud. (I didn’t actually need server class hardware for this cloud) But for the cost the capacity was still limited. Since I was primarily building a compute cloud to provide me with a pool of servers to allocate My first priority was the number of CPU cores in the cloud. This would give me the flexibility to scale any applications I was running on it. With that in mind I decided on the priority list for the hardware of:
- Number of Cores
- Amount of RAM
- Speed of CPU
The problem with building with desktop CPUs is (at the time I was assembling pieces) the core count / USD was not really that high for any of the desktop processors. Another popular choice for home clouds is the Intel NUCs, but these suffer from the same problem. The NUCs use laptop processors and while reasonably priced you’re still only getting a dual or quad core CPU for a few hundred dollars.
It turns out the best option I found for my somewhat bizarre requirements was to buy used hardware. A search of eBay shows a ton of servers from 8 or 9 years ago that are dirt cheap. After searching through my various options I settled on old Dell PowerEdge R610, which was a dual socket machine. The one I ordered came with 2 Intel Xeon E5540 CPUs in it. This gave me a total of 8 physical cores (or 16 virtual cores if you count HyperThreading/SMT) The machines also came with 32 GB of RAM and 2x 149GB SAS hard drives. The best part though was that each machine was only $215.56 USD. This gave me plenty of room in the budget, so I bought 5 of them. After shipping this ended up costing only $1,230.75. That gave me enough wiggle room for the other parts I’d need to make everything working. The full hardware specs from the eBay listing was:

Although, the best part about these servers were that I actually had a rack full of basically the same exact servers at the lab in college. The ones I had back in 2010 were a little bit slower and had half the RAM, but were otherwise the same. I configured those servers as a small HPC cluster my last year at college, so I was very familiar with them. Although back then those servers were over 10x the cost as what I was paying for them on eBay now.
The only problem with this choice was the hardware, the Xeon E5540 is incredibly slow by today’s standards. But, because of my limited budget speed was something I couldn’t really afford.
Assembling the Hardware
After waiting a few days the servers were delivered. That was a fun day, the FedEx delivery person didn’t bother to ring the door bell. Instead I heard big thud outside and found that they had left all the boxes in front of my apartment door. Fortunately I was home and heard them throw the boxes on the ground, because it was raining that day. Leaving my “new” servers out in the rain all day would have been less than an ideal way to start the project . It also made quite the commotion and several of my neighbors came out to see what was going on and watched me as I took the boxes inside.
After getting the boxes inside my apartment and unboxed, I stacked them on my living room table:

My next problem with this was where to put the servers and how to run them. I looked at buying a traditional rack, however they were a bit too pricey. (even on eBay) Just a 10U rack looked like it would cost over $100 USD and after shipping that wouldn’t leave me too much room if I needed something else. So I decided not to go that route. Then I remembered hearing about something called a LackRack a few years ago. It turns out the IKEA Lack table has a 19 inch width between the legs which is the same as a rack. They also only cost $9.99 which made it a much more economical choice compared to a more traditional rack. However, while I could just put the table on the floor and be done with it, I was planning to put the servers in my “data closet” (which is just a colorful term for my bedroom closet where I store servers and clothing) but I didn’t want to deal with having to pick up the “rack” every time I needed to move it. So I decided to get some casters and mount them to the table so I could just push the server around.
Once I got the table delivered, which took a surprisingly long time, I was able to mount he casters and rack the servers. As I put each server on the table I was able to test each of them out. (I only had a single power cable at the time, so I went one at a time) It turns out that each server was slightly different from the description and had several issues:
- 4x8GB of RAM not 8x4GB
- Memory installed in wrong slots
- Dead RAID controller battery
- Came with 15k RPM hard drives not 10k RPM
Also, the company that is “refurbishing” these old servers from whatever datacenter threw them away totally strips the servers down to the minimum possible unit. For example, the management controller was removed, as was the redundant power supply. Both of these were standard feature from Dell when these servers were new. Honestly, it makes sense, the margins on reselling old servers can’t be very high so the company is trying to make a little profit. I also really didn’t need anything they took out as long as the servers still booted. (although that management controller would have been nice)
Once I put all 5 servers on the rack:
After getting everything mounted on the rack it turns out I also needed a bunch of cables and another power strip to power all 5 at once. So I placed an order with Monoprice for the necessary bits and once they arrived I wired everything up in the data closet:

After everything was said and done the final bill of materials for all the hardware was:
| Part Name | Link | Price | Number | Shipping & Tax | Total |
|---|---|---|---|---|---|
| Dell PowerEdge R610 Virtualization Server 2.53GHz 8-Core E5540 32GB 2x146G PERC6 | http://www.ebay.com/itm/191545700823 | $215.56 | 5 | $152.95 | $1,230.75 |
| LACK Side table, yellow | http://www.ikea.com/us/en/catalog/products/40104270/#/10324278 | $9.99 | 1 | $13.65 | $23.64 |
| 6 Outlet Power Strip | https://www.monoprice.com/product?c_id=109&cp_id=10907&cs_id=1090703&p_id=13692&seq=1&format=2 | $7.90 | 1 | 10.49 | $18.39 |
| 3ft 16AWG Power Cord | https://www.monoprice.com/Product?p_id=5285 | $1.60 | 5 | 0 | $8.00 |
| FLEXboot Series Cat6 24AWG UTP Ethernet Network Patch Cable, 10ft Orange | https://www.monoprice.com/product?p_id=9808 | $1.76 | 10 | 0 | $17.60 |
| Casters | https://www.amazon.com/gp/product/B01FJ97E64/ref=od_aui_detailpages00?ie=UTF8&psc=1 | $29.99 | 1 | 0 | $29.99 |
| Grand Total: | $1,328.37 |
Installing the Operating System
After getting the working set of hardware the next step was to install the operating system on the servers. As I decided in the original project scope I was planning to follow the official install guide as much as possible. My operating system choice would therefore be dictated by those covered in the guide, the 3 Linux distributions documented were OpenSUSE/SLES, RHEL/CentOS, and Ubuntu. Of those the 3 my personal choice was Ubuntu which I personally find the easiest to deal with out of the choices. Although, looking back on it now if I were to do an install during job college I definitely would of have used RHEL. Georgia Tech had a site license for RHEL and a lot of software we had commercial licenses for only had support on RHEL. But, my preference today between those 3 options is to use Ubuntu.
I created a boot usb stick for Ubuntu Server 16.04 and proceeded to do a basic install on each server. (one at a time) The install itself just used the defaults, the only option I made sure was present was the OpenSSH server. This way once I finished the initial install I didn’t have to sit in front of the server to do anything. I would just install any other packages I needed after the install from the comfort of my home office. For the hostname I picked altocumulus because I think clouds should be named after clouds. Although, after I finished the project I got a bunch of better suggestions for the name like closet-cloud or laundry-cloud.
It’s worth pointing out that if the servers had come with the management controller installed this step would have been a lot easier. I could have just used that to mount the installer image and ran everything from the virtual console. I wouldn’t have had to sit in front of each server to start the install. But despite this it only took an hour or so to perform the install on all the servers. With the installs complete it was time to start the process of putting OpenStack on each server and creating my cloud.
Installing OpenStack
With the operating system installed it’s time to start the process of building the servers out. Given my limited hardware capacity, just 40 physical cores and 160GB of RAM, I decided that I didn’t want to sacrifice 1/5 of that capacity for a dedicated controller node. So I was going to setup the controller as a compute node as well. My goal for this project was to build a compute cloud, so all I was concerned about was installing the set of OpenStack projects required to achieve this. I didn’t have a lot of storage (the 2 149GB disks came configured out of the box with RAID 1 and I never bothered to change that) so providing anything more than ephemeral storage for the VMs wasn’t really an option.
OpenStack is a large project with a ton of different projects, (the complete list of official projects can be found here) But, I find some people have trouble figuring out exactly where to get started or for configuration X where to get started. The OpenStack Foundation actually has a page with a bunch of sample service selections by application. The OpenStack Technical Committee also maintains a list of projects needed for the compute starter kit which was exactly what I was looking for. The only potential problem is the discoverability of that information. It kinda feels like a needle in the haystack if you don’t know where to look.
It also turns out the install guide is mostly concerned with building a basic compute cloud (it also includes using cinder for block storage, but I just skipped that step) so even if I didn’t know the components I needed I would have been fine just reading the docs The overview section of the docs covers this briefly, but doesn’t go into much detail.
The basic service configuration I was planning to go with was:

With a rough idea of how I was planning to setup the software I started following the install guide on setting up the server. https://docs.openstack.org/ocata/install-guide-ubuntu/environment.html# walks you through setting up all the necessary Operating System level pieces like configuring the networking interfaces and NTP. It also goes over installing and configuring the service prerequisites like MySQL, RabbitMQ, and memcached. For this part I actually found the docs really easy to follow and very useful. Things were explained clearly and mostly it was just copy and paste the commands to set things up. But, I never felt like I was blindly doing anything for the base setup.
Installing and Configuring the OpenStack Components
After getting the environment for running OpenStack configured it was time to start installing the OpenStack components. Keystone is a requirement for all the other OpenStack services so you install this first. This is where I hit my first issue because I decided to use the release tarballs for the install. The install guide assumes you’re using packages from your Linux distribution to install OpenStack. So when I got to the second step in the Installing Keystone section of the install guide it said run “apt install keystone” which I didn’t want to do. (although it definitely would have made my life easier if I did)
Installing From Tarballs
It turns out there isn’t actually any documentation anywhere that concisely explains the steps required to installing an OpenStack component on your system from source. I started doing searching on Google to try and find any guides. The first hit was a series of blog posts on the Rackspace developer blog on installing OpenStack from source. However, a quick look at this showed this was quite out of date, especially for the latest version of OpenStack, Ocata, which I was deploying. Also, some of the steps documented there conflicted with the configuration recommended in the install guide. The other searches I found recommended that you look at devstack or use automation project X to accomplish this goal. Both of these were outside the scope of what I wanted to do for this project. So for the tarball install step I decided to ignore the premise of just following the install guide and just used my experience working on OpenStack to do the following steps to install the projects:
- Download the service tarballs. I found the releases page has a good index by project to get the latest tarball for each project. Then extract that tarball to an easy remember location. (I created a tarballs directory in my home directory to store them all)
- Create the service user for each project. I ran:
1useradd -r -M $service - Create the /etc and /var/lib directories for the service. For example on the controller node I used the following for loop in bash to do this for all the services:
12345for proj in keystone glance nova neutron ; dosudo mkdir /etc/$projsudo mkdir /var/lib/$projsudo chown -R $proj:$proj /etc/$proj /var/lib/$projdone - Install the binary package requirements for the project. This is things like libvirt for nova, or libssl. Basically anything you need to have installed to either build the python packages or to run the service. The problem here is that for most projects this is not documented anywhere. Most of the projects include a bindep.txt which can be used with the bindep project (or just manually read like I did) to show the distro package requirements on several distributions, but few projects use it for this. Instead it’s often just used for just the requirements for setting up a unit (or functional) test environment. I also didn’t find it in any of the developer documentation for the projects. This means you’re probably stuck with trial and error here. When you get to step 6 below it will likely fail with an error that a library header is missing and you’ll need to find the package and install that. Or when you run the service something it’s calling out to is missing and you’ll have errors in the service log until you install that missing dependency and restart the service.
- Copy the data files from etc/ in the tarball into /etc/$service for the project. The python packaging ecosystem does not provide a way for packages to install anything outside of the python lib/ directories. This means that to install the required configuration files (like policy.json files or api paste.ini files) have to be copied manually from the tarball.
- After you do all of those steps you can use pip to install the tarball. One thing to note here is that you want to use constraints when you run pip. This is something I forgot installing the first few services and it caused me a ton of headaches later in the process. You can avoid all of those potential problems up front by just running:
1pip install -U -c "https://git.openstack.org/cgit/openstack/requirements/plain/upper-constraints.txt?h=stable/ocata" $PATH_TO_EXTRACTED_TARBALL
If you’re using a different OpenStack release just replace “ocata” at the end of the url with that release name.
I wrote down these steps after I did the install mostly based on all of the issues I had during the install process. As you read through the rest of this post most of the issues I encountered could have been completely avoided if I did all of these up front.
It’s also worth noting that all of these steps are provided by the distro packages for OpenStack. This is exactly the role that packaging plays for users, and I was just going through the motions here because I decided to use tarballs. Python packages aren’t really designed for use in systems software and have a lot of limitations beyond the basic case of: put my python code in the place where python code lives. If you want more details on this Clark Boylan gave a good talk on this topic at the OpenStack summit in Boston.
I have also been trying to make a push to start documenting these things in the project developer docs so it’s not an exercise in misery for anyone else wanting to install from source. But, I’ve been getting push back on this because most people seem to feel like it’s a low priority and most people will just use packages. (and packagers seem to have already figured out the pattern for building things)
Creating systemd unit files
One thing that isn’t strictly a requirement when installing from source is creating systemd unit files. (or init scripts if you’re lucky enough to have a distro that still supports using SysV init) Creating a systemd unit file for each daemon process you’ll be running is helpful so you don’t have to manually run the command for each daemon. When I built the cloud I created a unit file for each daemon I ran on both the controller as well as all of the compute nodes. This enabled me to configure each service to start automatically on boot, but also encode the command for starting the daemons, so I could treat it like any other service running on the system. This is another thing that distro packages provide for you, but you’ll have to do yourself when building from source.
For an example this is the contents of my nova-api systemd unit file which I put in /etc/systemd/system/nova-api.service:
|
1 2 3 4 5 6 7 8 9 10 11 |
[Unit] Description=OpenStack Nova API After=network.target [Service] ExecStart=/usr/local/bin/nova-api --config-file /etc/nova/nova.conf User=nova Group=nova [Install] WantedBy=multi-user.target |
All the other service follow this same format, except for anything running under uwsgi (like keystone, more on that in the next section) , but you can refer to the uwsgi docs for more information on that.
Configuring Keystone
With the formula worked out for how to install from tarball I was ready to continue following the install guide. The only other issue I had was setting up running the wsgi script under apache. By default keystone ships as a wsgi script that requires a web server to run it. The install guide doesn’t cover this because the distro packages will do the required setup for you. But, because I was installing from tarballs I had to figure out how to do this myself. Luckily the keystone docs provide a guide on how to do this, and include sample config files in the tarball. The rest of configuring keystone was really straightforward, the keystone.conf only required 2 configuration options. (one for the database connection info and the other for the token type) After setting those I had to run a handful of commands to update the database schema and then populate it with some initial data. It’s not worth repeating all the commands here, since you can just read the keystone section of the install guide. In my case I did encounter one issue when I first started the keystone service. I hit a requirements mismatch which prevent keystone from starting:
|
1 2 3 4 5 6 7 8 9 10 11 12 13 14 15 16 17 18 19 20 21 22 23 24 25 26 27 28 29 30 31 32 33 34 35 36 37 38 39 40 41 42 43 44 45 46 47 48 49 50 51 52 |
2017-03-29 15:27:01.478 26833 ERROR keystone Traceback (most recent call last): 2017-03-29 15:27:01.478 26833 ERROR keystone File "/usr/local/bin/keystone-wsgi-admin", line 51, in <module> 2017-03-29 15:27:01.478 26833 ERROR keystone application = initialize_admin_application() 2017-03-29 15:27:01.478 26833 ERROR keystone File "/usr/local/lib/python2.7/dist-packages/keystone/server/wsgi.py", line 132, in initialize_admin_application 2017-03-29 15:27:01.478 26833 ERROR keystone config_files=_get_config_files()) 2017-03-29 15:27:01.478 26833 ERROR keystone File "/usr/local/lib/python2.7/dist-packages/keystone/server/wsgi.py", line 69, in initialize_application 2017-03-29 15:27:01.478 26833 ERROR keystone startup_application_fn=loadapp) 2017-03-29 15:27:01.478 26833 ERROR keystone File "/usr/local/lib/python2.7/dist-packages/keystone/server/common.py", line 50, in setup_backends 2017-03-29 15:27:01.478 26833 ERROR keystone res = startup_application_fn() 2017-03-29 15:27:01.478 26833 ERROR keystone File "/usr/local/lib/python2.7/dist-packages/keystone/server/wsgi.py", line 66, in loadapp 2017-03-29 15:27:01.478 26833 ERROR keystone 'config:%s' % find_paste_config(), name) 2017-03-29 15:27:01.478 26833 ERROR keystone File "/usr/local/lib/python2.7/dist-packages/keystone/version/service.py", line 53, in loadapp 2017-03-29 15:27:01.478 26833 ERROR keystone controllers.latest_app = deploy.loadapp(conf, name=name) 2017-03-29 15:27:01.478 26833 ERROR keystone File "/usr/local/lib/python2.7/dist-packages/paste/deploy/loadwsgi.py", line 247, in loadapp 2017-03-29 15:27:01.478 26833 ERROR keystone return loadobj(APP, uri, name=name, **kw) 2017-03-29 15:27:01.478 26833 ERROR keystone File "/usr/local/lib/python2.7/dist-packages/paste/deploy/loadwsgi.py", line 272, in loadobj 2017-03-29 15:27:01.478 26833 ERROR keystone return context.create() 2017-03-29 15:27:01.478 26833 ERROR keystone File "/usr/local/lib/python2.7/dist-packages/paste/deploy/loadwsgi.py", line 710, in create 2017-03-29 15:27:01.478 26833 ERROR keystone return self.object_type.invoke(self) 2017-03-29 15:27:01.478 26833 ERROR keystone File "/usr/local/lib/python2.7/dist-packages/paste/deploy/loadwsgi.py", line 144, in invoke 2017-03-29 15:27:01.478 26833 ERROR keystone **context.local_conf) 2017-03-29 15:27:01.478 26833 ERROR keystone File "/usr/local/lib/python2.7/dist-packages/paste/deploy/util.py", line 55, in fix_call 2017-03-29 15:27:01.478 26833 ERROR keystone val = callable(*args, **kw) 2017-03-29 15:27:01.478 26833 ERROR keystone File "/usr/local/lib/python2.7/dist-packages/paste/urlmap.py", line 31, in urlmap_factory 2017-03-29 15:27:01.478 26833 ERROR keystone app = loader.get_app(app_name, global_conf=global_conf) 2017-03-29 15:27:01.478 26833 ERROR keystone File "/usr/local/lib/python2.7/dist-packages/paste/deploy/loadwsgi.py", line 350, in get_app 2017-03-29 15:27:01.478 26833 ERROR keystone name=name, global_conf=global_conf).create() 2017-03-29 15:27:01.478 26833 ERROR keystone File "/usr/local/lib/python2.7/dist-packages/paste/deploy/loadwsgi.py", line 362, in app_context 2017-03-29 15:27:01.478 26833 ERROR keystone APP, name=name, global_conf=global_conf) 2017-03-29 15:27:01.478 26833 ERROR keystone File "/usr/local/lib/python2.7/dist-packages/paste/deploy/loadwsgi.py", line 450, in get_context 2017-03-29 15:27:01.478 26833 ERROR keystone global_additions=global_additions) 2017-03-29 15:27:01.478 26833 ERROR keystone File "/usr/local/lib/python2.7/dist-packages/paste/deploy/loadwsgi.py", line 559, in _pipeline_app_context 2017-03-29 15:27:01.478 26833 ERROR keystone APP, pipeline[-1], global_conf) 2017-03-29 15:27:01.478 26833 ERROR keystone File "/usr/local/lib/python2.7/dist-packages/paste/deploy/loadwsgi.py", line 454, in get_context 2017-03-29 15:27:01.478 26833 ERROR keystone section) 2017-03-29 15:27:01.478 26833 ERROR keystone File "/usr/local/lib/python2.7/dist-packages/paste/deploy/loadwsgi.py", line 476, in _context_from_use 2017-03-29 15:27:01.478 26833 ERROR keystone object_type, name=use, global_conf=global_conf) 2017-03-29 15:27:01.478 26833 ERROR keystone File "/usr/local/lib/python2.7/dist-packages/paste/deploy/loadwsgi.py", line 406, in get_context 2017-03-29 15:27:01.478 26833 ERROR keystone global_conf=global_conf) 2017-03-29 15:27:01.478 26833 ERROR keystone File "/usr/local/lib/python2.7/dist-packages/paste/deploy/loadwsgi.py", line 296, in loadcontext 2017-03-29 15:27:01.478 26833 ERROR keystone global_conf=global_conf) 2017-03-29 15:27:01.478 26833 ERROR keystone File "/usr/local/lib/python2.7/dist-packages/paste/deploy/loadwsgi.py", line 328, in _loadegg 2017-03-29 15:27:01.478 26833 ERROR keystone return loader.get_context(object_type, name, global_conf) 2017-03-29 15:27:01.478 26833 ERROR keystone File "/usr/local/lib/python2.7/dist-packages/paste/deploy/loadwsgi.py", line 620, in get_context 2017-03-29 15:27:01.478 26833 ERROR keystone object_type, name=name) 2017-03-29 15:27:01.478 26833 ERROR keystone File "/usr/local/lib/python2.7/dist-packages/paste/deploy/loadwsgi.py", line 640, in find_egg_entry_point 2017-03-29 15:27:01.478 26833 ERROR keystone pkg_resources.require(self.spec) 2017-03-29 15:27:01.478 26833 ERROR keystone File "/usr/lib/python2.7/dist-packages/pkg_resources/__init__.py", line 943, in require 2017-03-29 15:27:01.478 26833 ERROR keystone needed = self.resolve(parse_requirements(requirements)) 2017-03-29 15:27:01.478 26833 ERROR keystone File "/usr/lib/python2.7/dist-packages/pkg_resources/__init__.py", line 834, in resolve 2017-03-29 15:27:01.478 26833 ERROR keystone raise VersionConflict(dist, req).with_context(dependent_req) 2017-03-29 15:27:01.478 26833 ERROR keystone ContextualVersionConflict: (requests 2.13.0 (/usr/local/lib/python2.7/dist-packages), Requirement.parse('requests!=2.12.2,!=2.13.0,>=2.10.0'), set(['oslo.policy'])) |
This was caused solely because I forgot to use pip constraints at first when I started installing the controller node (I remembered later). Pip doesn’t have a dependency solver and just naively installs packages in the order its told. This causes all sorts of conflicts if 2 packages have the same requirement with different versions. (even if there is overlap and a correct version can be figured out) Using constraints like I recommended before would have avoided this. But after resolving the conflict keystone worked perfectly and I was ready to move on to the next service.
Installing Glance
The next service to install by following the install guide is Glance. The process for configuring glance was pretty straightforward. Just as with keystone it’s not worth repeating all the steps from the install guide section on Glance. But, at a high level you just create the database in mysql, configure glance with the details for connecting to MySQL, connecting to Keystone, and how to store images. After that you run the DB schema migrations to set the schema for the MySQL database, and create the endpoint and service users in keystone. After going through all the steps I did encounter one problem in Glance when I first started it up. The glance log had this traceback:
|
1 2 3 4 5 6 7 8 9 10 11 12 13 14 15 16 17 18 19 20 21 22 23 24 25 26 |
2017-03-29 16:21:52.038 29647 ERROR glance.api.v2.image_data Traceback (most recent call last): 2017-03-29 16:21:52.038 29647 ERROR glance.api.v2.image_data File "/usr/local/lib/python2.7/dist-packages/glance/api/v2/image_data.py", line 116, in upload 2017-03-29 16:21:52.038 29647 ERROR glance.api.v2.image_data image.set_data(data, size) 2017-03-29 16:21:52.038 29647 ERROR glance.api.v2.image_data File "/usr/local/lib/python2.7/dist-packages/glance/domain/proxy.py", line 195, in set_data 2017-03-29 16:21:52.038 29647 ERROR glance.api.v2.image_data self.base.set_data(data, size) 2017-03-29 16:21:52.038 29647 ERROR glance.api.v2.image_data File "/usr/local/lib/python2.7/dist-packages/glance/notifier.py", line 480, in set_data 2017-03-29 16:21:52.038 29647 ERROR glance.api.v2.image_data _send_notification(notify_error, 'image.upload', msg) 2017-03-29 16:21:52.038 29647 ERROR glance.api.v2.image_data File "/usr/local/lib/python2.7/dist-packages/oslo_utils/excutils.py", line 220, in __exit__ 2017-03-29 16:21:52.038 29647 ERROR glance.api.v2.image_data self.force_reraise() 2017-03-29 16:21:52.038 29647 ERROR glance.api.v2.image_data File "/usr/local/lib/python2.7/dist-packages/oslo_utils/excutils.py", line 196, in force_reraise 2017-03-29 16:21:52.038 29647 ERROR glance.api.v2.image_data six.reraise(self.type_, self.value, self.tb) 2017-03-29 16:21:52.038 29647 ERROR glance.api.v2.image_data File "/usr/local/lib/python2.7/dist-packages/glance/notifier.py", line 427, in set_data 2017-03-29 16:21:52.038 29647 ERROR glance.api.v2.image_data self.repo.set_data(data, size) 2017-03-29 16:21:52.038 29647 ERROR glance.api.v2.image_data File "/usr/local/lib/python2.7/dist-packages/glance/api/policy.py", line 192, in set_data 2017-03-29 16:21:52.038 29647 ERROR glance.api.v2.image_data return self.image.set_data(*args, **kwargs) 2017-03-29 16:21:52.038 29647 ERROR glance.api.v2.image_data File "/usr/local/lib/python2.7/dist-packages/glance/quota/__init__.py", line 304, in set_data 2017-03-29 16:21:52.038 29647 ERROR glance.api.v2.image_data self.image.set_data(data, size=size) 2017-03-29 16:21:52.038 29647 ERROR glance.api.v2.image_data File "/usr/local/lib/python2.7/dist-packages/glance/location.py", line 439, in set_data 2017-03-29 16:21:52.038 29647 ERROR glance.api.v2.image_data verifier=verifier) 2017-03-29 16:21:52.038 29647 ERROR glance.api.v2.image_data File "/usr/local/lib/python2.7/dist-packages/glance_store/backend.py", line 453, in add_to_backend 2017-03-29 16:21:52.038 29647 ERROR glance.api.v2.image_data verifier) 2017-03-29 16:21:52.038 29647 ERROR glance.api.v2.image_data File "/usr/local/lib/python2.7/dist-packages/glance_store/backend.py", line 426, in store_add_to_backend 2017-03-29 16:21:52.038 29647 ERROR glance.api.v2.image_data verifier=verifier) 2017-03-29 16:21:52.038 29647 ERROR glance.api.v2.image_data File "/usr/local/lib/python2.7/dist-packages/glance_store/capabilities.py", line 223, in op_checker 2017-03-29 16:21:52.038 29647 ERROR glance.api.v2.image_data raise op_exec_map[op](**kwargs) 2017-03-29 16:21:52.038 29647 ERROR glance.api.v2.image_data StoreAddDisabled: Configuration for store failed. Adding images to this store is disabled. |
I forgot to create the /var/lib/glance dir, so there was no directory to store the images in. Again something else which would have been fix if I followed the steps I outlined in the installing from tarballs section. But after creating the directory everything worked.
One thing I do want to note here is that I have small issue with the verification steps for Glance outlined in the install guide. The steps there don’t really go far enough to verify the image uploaded was actually stored properly, just that glance created the image. This was a problem I had later in the installation and I could have caught it earlier if the verification steps instructed you to download the image from glance and compare it to the source image.
Installing Nova
The next service in the install guide is Nova. Nova was a bit more involved compared to Glance or Keystone, but it has more moving parts so that’s understandable. Just as with the other services refer to the install guide section for Nova for all the step by step details. There are more steps for nova in general so it’s not worth even outlining the high level flow here. One thing you’ll need to be aware of is that Nova includes 2 separate API services that you’ll be running, the Nova API and the Placement API. The Placement API is a recent addition since Newton which is used to provide data for scheduling logic and is a completely self contained service. Just like keystone, the placement API only ships as a wsgi script. But unlike keystone there was no documentation (this has changed, or in progress at least) about the install process and no example config files provided. It’s pretty straightforward to adapt what you used to keystone, but this was another thing I had to figure out on my own.
After getting everything configured according to the install guide I hit a few little things that I needed to fix. The first was that I forgot to create a state directory that I specified in the config file:
|
1 2 3 4 5 6 7 8 9 10 11 12 13 14 15 16 17 18 19 20 21 22 23 24 25 26 27 28 29 30 31 32 33 34 35 36 37 38 39 40 41 42 43 44 45 46 47 48 49 50 51 52 53 54 55 56 57 58 59 60 |
2017-03-29 17:46:28.176 32263 ERROR nova Traceback (most recent call last): 2017-03-29 17:46:28.176 32263 ERROR nova File "/usr/local/bin/nova-api", line 10, in <module> 2017-03-29 17:46:28.176 32263 ERROR nova sys.exit(main()) 2017-03-29 17:46:28.176 32263 ERROR nova File "/usr/local/lib/python2.7/dist-packages/nova/cmd/api.py", line 59, in main 2017-03-29 17:46:28.176 32263 ERROR nova server = service.WSGIService(api, use_ssl=should_use_ssl) 2017-03-29 17:46:28.176 32263 ERROR nova File "/usr/local/lib/python2.7/dist-packages/nova/service.py", line 311, in __init__ 2017-03-29 17:46:28.176 32263 ERROR nova self.app = self.loader.load_app(name) 2017-03-29 17:46:28.176 32263 ERROR nova File "/usr/local/lib/python2.7/dist-packages/nova/wsgi.py", line 497, in load_app 2017-03-29 17:46:28.176 32263 ERROR nova return deploy.loadapp("config:%s" % self.config_path, name=name) 2017-03-29 17:46:28.176 32263 ERROR nova File "/usr/local/lib/python2.7/dist-packages/paste/deploy/loadwsgi.py", line 247, in loadapp 2017-03-29 17:46:28.176 32263 ERROR nova return loadobj(APP, uri, name=name, **kw) 2017-03-29 17:46:28.176 32263 ERROR nova File "/usr/local/lib/python2.7/dist-packages/paste/deploy/loadwsgi.py", line 272, in loadobj 2017-03-29 17:46:28.176 32263 ERROR nova return context.create() 2017-03-29 17:46:28.176 32263 ERROR nova File "/usr/local/lib/python2.7/dist-packages/paste/deploy/loadwsgi.py", line 710, in create 2017-03-29 17:46:28.176 32263 ERROR nova return self.object_type.invoke(self) 2017-03-29 17:46:28.176 32263 ERROR nova File "/usr/local/lib/python2.7/dist-packages/paste/deploy/loadwsgi.py", line 144, in invoke 2017-03-29 17:46:28.176 32263 ERROR nova **context.local_conf) 2017-03-29 17:46:28.176 32263 ERROR nova File "/usr/local/lib/python2.7/dist-packages/paste/deploy/util.py", line 55, in fix_call 2017-03-29 17:46:28.176 32263 ERROR nova val = callable(*args, **kw) 2017-03-29 17:46:28.176 32263 ERROR nova File "/usr/local/lib/python2.7/dist-packages/nova/api/openstack/urlmap.py", line 160, in urlmap_factory 2017-03-29 17:46:28.176 32263 ERROR nova app = loader.get_app(app_name, global_conf=global_conf) 2017-03-29 17:46:28.176 32263 ERROR nova File "/usr/local/lib/python2.7/dist-packages/paste/deploy/loadwsgi.py", line 350, in get_app 2017-03-29 17:46:28.176 32263 ERROR nova name=name, global_conf=global_conf).create() 2017-03-29 17:46:28.176 32263 ERROR nova File "/usr/local/lib/python2.7/dist-packages/paste/deploy/loadwsgi.py", line 710, in create 2017-03-29 17:46:28.176 32263 ERROR nova return self.object_type.invoke(self) 2017-03-29 17:46:28.176 32263 ERROR nova File "/usr/local/lib/python2.7/dist-packages/paste/deploy/loadwsgi.py", line 144, in invoke 2017-03-29 17:46:28.176 32263 ERROR nova **context.local_conf) 2017-03-29 17:46:28.176 32263 ERROR nova File "/usr/local/lib/python2.7/dist-packages/paste/deploy/util.py", line 55, in fix_call 2017-03-29 17:46:28.176 32263 ERROR nova val = callable(*args, **kw) 2017-03-29 17:46:28.176 32263 ERROR nova File "/usr/local/lib/python2.7/dist-packages/nova/api/auth.py", line 57, in pipeline_factory_v21 2017-03-29 17:46:28.176 32263 ERROR nova return _load_pipeline(loader, local_conf[CONF.api.auth_strategy].split()) 2017-03-29 17:46:28.176 32263 ERROR nova File "/usr/local/lib/python2.7/dist-packages/nova/api/auth.py", line 38, in _load_pipeline 2017-03-29 17:46:28.176 32263 ERROR nova app = loader.get_app(pipeline[-1]) 2017-03-29 17:46:28.176 32263 ERROR nova File "/usr/local/lib/python2.7/dist-packages/paste/deploy/loadwsgi.py", line 350, in get_app 2017-03-29 17:46:28.176 32263 ERROR nova name=name, global_conf=global_conf).create() 2017-03-29 17:46:28.176 32263 ERROR nova File "/usr/local/lib/python2.7/dist-packages/paste/deploy/loadwsgi.py", line 710, in create 2017-03-29 17:46:28.176 32263 ERROR nova return self.object_type.invoke(self) 2017-03-29 17:46:28.176 32263 ERROR nova File "/usr/local/lib/python2.7/dist-packages/paste/deploy/loadwsgi.py", line 146, in invoke 2017-03-29 17:46:28.176 32263 ERROR nova return fix_call(context.object, context.global_conf, **context.local_conf) 2017-03-29 17:46:28.176 32263 ERROR nova File "/usr/local/lib/python2.7/dist-packages/paste/deploy/util.py", line 55, in fix_call 2017-03-29 17:46:28.176 32263 ERROR nova val = callable(*args, **kw) 2017-03-29 17:46:28.176 32263 ERROR nova File "/usr/local/lib/python2.7/dist-packages/nova/api/openstack/__init__.py", line 218, in factory 2017-03-29 17:46:28.176 32263 ERROR nova return cls() 2017-03-29 17:46:28.176 32263 ERROR nova File "/usr/local/lib/python2.7/dist-packages/nova/api/openstack/compute/__init__.py", line 31, in __init__ 2017-03-29 17:46:28.176 32263 ERROR nova super(APIRouterV21, self).__init__() 2017-03-29 17:46:28.176 32263 ERROR nova File "/usr/local/lib/python2.7/dist-packages/nova/api/openstack/__init__.py", line 243, in __init__ 2017-03-29 17:46:28.176 32263 ERROR nova self._register_resources_check_inherits(mapper) 2017-03-29 17:46:28.176 32263 ERROR nova File "/usr/local/lib/python2.7/dist-packages/nova/api/openstack/__init__.py", line 259, in _register_resources_check_inherits 2017-03-29 17:46:28.176 32263 ERROR nova for resource in ext.obj.get_resources(): 2017-03-29 17:46:28.176 32263 ERROR nova File "/usr/local/lib/python2.7/dist-packages/nova/api/openstack/compute/cloudpipe.py", line 187, in get_resources 2017-03-29 17:46:28.176 32263 ERROR nova CloudpipeController())] 2017-03-29 17:46:28.176 32263 ERROR nova File "/usr/local/lib/python2.7/dist-packages/nova/api/openstack/compute/cloudpipe.py", line 48, in __init__ 2017-03-29 17:46:28.176 32263 ERROR nova self.setup() 2017-03-29 17:46:28.176 32263 ERROR nova File "/usr/local/lib/python2.7/dist-packages/nova/api/openstack/compute/cloudpipe.py", line 55, in setup 2017-03-29 17:46:28.176 32263 ERROR nova fileutils.ensure_tree(CONF.crypto.keys_path) 2017-03-29 17:46:28.176 32263 ERROR nova File "/usr/local/lib/python2.7/dist-packages/oslo_utils/fileutils.py", line 40, in ensure_tree 2017-03-29 17:46:28.176 32263 ERROR nova os.makedirs(path, mode) 2017-03-29 17:46:28.176 32263 ERROR nova File "/usr/lib/python2.7/os.py", line 157, in makedirs 2017-03-29 17:46:28.176 32263 ERROR nova mkdir(name, mode) 2017-03-29 17:46:28.176 32263 ERROR nova OSError: [Errno 13] Permission denied: '/usr/local/lib/python2.7/dist-packages/keys' |
This was simple to fix and all I had to do was create the directory and set the owner to the service user. The second issue was my old friend the requirements mismatch:
|
1 2 3 4 5 6 7 8 9 10 11 12 13 14 15 16 17 18 19 20 21 22 23 24 25 26 27 28 29 30 31 32 33 34 35 36 37 38 39 40 41 42 43 44 45 46 47 48 49 50 51 52 |
2017-03-29 18:33:11.433 1155 ERROR nova Traceback (most recent call last): 2017-03-29 18:33:11.433 1155 ERROR nova File "/usr/local/bin/nova-api", line 10, in <module> 2017-03-29 18:33:11.433 1155 ERROR nova sys.exit(main()) 2017-03-29 18:33:11.433 1155 ERROR nova File "/usr/local/lib/python2.7/dist-packages/nova/cmd/api.py", line 59, in main 2017-03-29 18:33:11.433 1155 ERROR nova server = service.WSGIService(api, use_ssl=should_use_ssl) 2017-03-29 18:33:11.433 1155 ERROR nova File "/usr/local/lib/python2.7/dist-packages/nova/service.py", line 311, in __init__ 2017-03-29 18:33:11.433 1155 ERROR nova self.app = self.loader.load_app(name) 2017-03-29 18:33:11.433 1155 ERROR nova File "/usr/local/lib/python2.7/dist-packages/nova/wsgi.py", line 497, in load_app 2017-03-29 18:33:11.433 1155 ERROR nova return deploy.loadapp("config:%s" % self.config_path, name=name) 2017-03-29 18:33:11.433 1155 ERROR nova File "/usr/local/lib/python2.7/dist-packages/paste/deploy/loadwsgi.py", line 247, in loadapp 2017-03-29 18:33:11.433 1155 ERROR nova return loadobj(APP, uri, name=name, **kw) 2017-03-29 18:33:11.433 1155 ERROR nova File "/usr/local/lib/python2.7/dist-packages/paste/deploy/loadwsgi.py", line 272, in loadobj 2017-03-29 18:33:11.433 1155 ERROR nova return context.create() 2017-03-29 18:33:11.433 1155 ERROR nova File "/usr/local/lib/python2.7/dist-packages/paste/deploy/loadwsgi.py", line 710, in create 2017-03-29 18:33:11.433 1155 ERROR nova return self.object_type.invoke(self) 2017-03-29 18:33:11.433 1155 ERROR nova File "/usr/local/lib/python2.7/dist-packages/paste/deploy/loadwsgi.py", line 144, in invoke 2017-03-29 18:33:11.433 1155 ERROR nova **context.local_conf) 2017-03-29 18:33:11.433 1155 ERROR nova File "/usr/local/lib/python2.7/dist-packages/paste/deploy/util.py", line 55, in fix_call 2017-03-29 18:33:11.433 1155 ERROR nova val = callable(*args, **kw) 2017-03-29 18:33:11.433 1155 ERROR nova File "/usr/local/lib/python2.7/dist-packages/paste/urlmap.py", line 31, in urlmap_factory 2017-03-29 18:33:11.433 1155 ERROR nova app = loader.get_app(app_name, global_conf=global_conf) 2017-03-29 18:33:11.433 1155 ERROR nova File "/usr/local/lib/python2.7/dist-packages/paste/deploy/loadwsgi.py", line 350, in get_app 2017-03-29 18:33:11.433 1155 ERROR nova name=name, global_conf=global_conf).create() 2017-03-29 18:33:11.433 1155 ERROR nova File "/usr/local/lib/python2.7/dist-packages/paste/deploy/loadwsgi.py", line 710, in create 2017-03-29 18:33:11.433 1155 ERROR nova return self.object_type.invoke(self) 2017-03-29 18:33:11.433 1155 ERROR nova File "/usr/local/lib/python2.7/dist-packages/paste/deploy/loadwsgi.py", line 203, in invoke 2017-03-29 18:33:11.433 1155 ERROR nova app = context.app_context.create() 2017-03-29 18:33:11.433 1155 ERROR nova File "/usr/local/lib/python2.7/dist-packages/paste/deploy/loadwsgi.py", line 710, in create 2017-03-29 18:33:11.433 1155 ERROR nova return self.object_type.invoke(self) 2017-03-29 18:33:11.433 1155 ERROR nova File "/usr/local/lib/python2.7/dist-packages/paste/deploy/loadwsgi.py", line 146, in invoke 2017-03-29 18:33:11.433 1155 ERROR nova return fix_call(context.object, context.global_conf, **context.local_conf) 2017-03-29 18:33:11.433 1155 ERROR nova File "/usr/local/lib/python2.7/dist-packages/paste/deploy/util.py", line 55, in fix_call 2017-03-29 18:33:11.433 1155 ERROR nova val = callable(*args, **kw) 2017-03-29 18:33:11.433 1155 ERROR nova File "/usr/local/lib/python2.7/dist-packages/nova/wsgi.py", line 270, in factory 2017-03-29 18:33:11.433 1155 ERROR nova return cls(**local_config) 2017-03-29 18:33:11.433 1155 ERROR nova File "/usr/local/lib/python2.7/dist-packages/nova/api/metadata/handler.py", line 49, in __init__ 2017-03-29 18:33:11.433 1155 ERROR nova expiration_time=CONF.api.metadata_cache_expiration) 2017-03-29 18:33:11.433 1155 ERROR nova File "/usr/local/lib/python2.7/dist-packages/nova/cache_utils.py", line 58, in get_client 2017-03-29 18:33:11.433 1155 ERROR nova backend='oslo_cache.dict')) 2017-03-29 18:33:11.433 1155 ERROR nova File "/usr/local/lib/python2.7/dist-packages/nova/cache_utils.py", line 96, in _get_custom_cache_region 2017-03-29 18:33:11.433 1155 ERROR nova region.configure(backend, **region_params) 2017-03-29 18:33:11.433 1155 ERROR nova File "/usr/local/lib/python2.7/dist-packages/dogpile/cache/region.py", line 413, in configure 2017-03-29 18:33:11.433 1155 ERROR nova backend_cls = _backend_loader.load(backend) 2017-03-29 18:33:11.433 1155 ERROR nova File "/usr/local/lib/python2.7/dist-packages/dogpile/util/langhelpers.py", line 40, in load 2017-03-29 18:33:11.433 1155 ERROR nova return impl.load() 2017-03-29 18:33:11.433 1155 ERROR nova File "/usr/local/lib/python2.7/dist-packages/pkg_resources/__init__.py", line 2301, in load 2017-03-29 18:33:11.433 1155 ERROR nova self.require(*args, **kwargs) 2017-03-29 18:33:11.433 1155 ERROR nova File "/usr/local/lib/python2.7/dist-packages/pkg_resources/__init__.py", line 2324, in require 2017-03-29 18:33:11.433 1155 ERROR nova items = working_set.resolve(reqs, env, installer, extras=self.extras) 2017-03-29 18:33:11.433 1155 ERROR nova File "/usr/local/lib/python2.7/dist-packages/pkg_resources/__init__.py", line 859, in resolve 2017-03-29 18:33:11.433 1155 ERROR nova raise VersionConflict(dist, req).with_context(dependent_req) 2017-03-29 18:33:11.433 1155 ERROR nova ContextualVersionConflict: (pbr 1.10.0 (/usr/local/lib/python2.7/dist-packages), Requirement.parse('pbr>=2.0.0'), set(['oslo.i18n', 'oslo.log', 'oslo.context', 'oslo.utils'])) |
In this instance it was a pretty base requirement, pbr, that was at the wrong version. When I saw this I realized that I forgot to use constraints (because pbr is used by everything in OpenStack) and I quickly reran pip install for nova with the constraints argument to correct this issue.
The final thing I hit was a missing sudoers file:
|
1 2 3 4 5 6 7 8 9 10 11 12 13 14 15 16 17 18 19 20 21 22 23 24 25 26 27 28 29 30 31 32 |
2017-03-29 18:29:47.844 905 ERROR nova Traceback (most recent call last): 2017-03-29 18:29:47.844 905 ERROR nova File "/usr/local/bin/nova-api", line 10, in <module> 2017-03-29 18:29:47.844 905 ERROR nova sys.exit(main()) 2017-03-29 18:29:47.844 905 ERROR nova File "/usr/local/lib/python2.7/dist-packages/nova/cmd/api.py", line 59, in main 2017-03-29 18:29:47.844 905 ERROR nova server = service.WSGIService(api, use_ssl=should_use_ssl) 2017-03-29 18:29:47.844 905 ERROR nova File "/usr/local/lib/python2.7/dist-packages/nova/service.py", line 309, in __init__ 2017-03-29 18:29:47.844 905 ERROR nova self.manager = self._get_manager() 2017-03-29 18:29:47.844 905 ERROR nova File "/usr/local/lib/python2.7/dist-packages/nova/service.py", line 364, in _get_manager 2017-03-29 18:29:47.844 905 ERROR nova return manager_class() 2017-03-29 18:29:47.844 905 ERROR nova File "/usr/local/lib/python2.7/dist-packages/nova/api/manager.py", line 30, in __init__ 2017-03-29 18:29:47.844 905 ERROR nova self.network_driver.metadata_accept() 2017-03-29 18:29:47.844 905 ERROR nova File "/usr/local/lib/python2.7/dist-packages/nova/network/linux_net.py", line 606, in metadata_accept 2017-03-29 18:29:47.844 905 ERROR nova iptables_manager.apply() 2017-03-29 18:29:47.844 905 ERROR nova File "/usr/local/lib/python2.7/dist-packages/nova/network/linux_net.py", line 346, in apply 2017-03-29 18:29:47.844 905 ERROR nova self._apply() 2017-03-29 18:29:47.844 905 ERROR nova File "/usr/local/lib/python2.7/dist-packages/oslo_concurrency/lockutils.py", line 271, in inner 2017-03-29 18:29:47.844 905 ERROR nova return f(*args, **kwargs) 2017-03-29 18:29:47.844 905 ERROR nova File "/usr/local/lib/python2.7/dist-packages/nova/network/linux_net.py", line 366, in _apply 2017-03-29 18:29:47.844 905 ERROR nova attempts=5) 2017-03-29 18:29:47.844 905 ERROR nova File "/usr/local/lib/python2.7/dist-packages/nova/network/linux_net.py", line 1167, in _execute 2017-03-29 18:29:47.844 905 ERROR nova return utils.execute(*cmd, **kwargs) 2017-03-29 18:29:47.844 905 ERROR nova File "/usr/local/lib/python2.7/dist-packages/nova/utils.py", line 297, in execute 2017-03-29 18:29:47.844 905 ERROR nova return RootwrapProcessHelper().execute(*cmd, **kwargs) 2017-03-29 18:29:47.844 905 ERROR nova File "/usr/local/lib/python2.7/dist-packages/nova/utils.py", line 180, in execute 2017-03-29 18:29:47.844 905 ERROR nova return processutils.execute(*cmd, **kwargs) 2017-03-29 18:29:47.844 905 ERROR nova File "/usr/local/lib/python2.7/dist-packages/oslo_concurrency/processutils.py", line 400, in execute 2017-03-29 18:29:47.844 905 ERROR nova cmd=sanitized_cmd) 2017-03-29 18:29:47.844 905 ERROR nova ProcessExecutionError: Unexpected error while running command. 2017-03-29 18:29:47.844 905 ERROR nova Command: sudo nova-rootwrap /etc/nova/rootwrap.conf iptables-save -c 2017-03-29 18:29:47.844 905 ERROR nova Exit code: 1 2017-03-29 18:29:47.844 905 ERROR nova Stdout: u'' 2017-03-29 18:29:47.844 905 ERROR nova Stderr: u'sudo: no tty present and no askpass program specified\n' |
Nova needs root priveleges to perform some operations. To do this it leverages a program called rootwrap to do the privelege escalation. But it needs sudo to be able to leverage rootwrap. I was able to to fix this by creating a sudoers file for nova like:
|
1 |
nova ALL=(root) NOPASSWD: /usr/local/bin/nova-rootwrap /etc/nova/rootwrap.conf |
After correcting those 3 issues I got Nova running without any errors (at least with the verification steps outlined in the install guide)
Installing Neutron
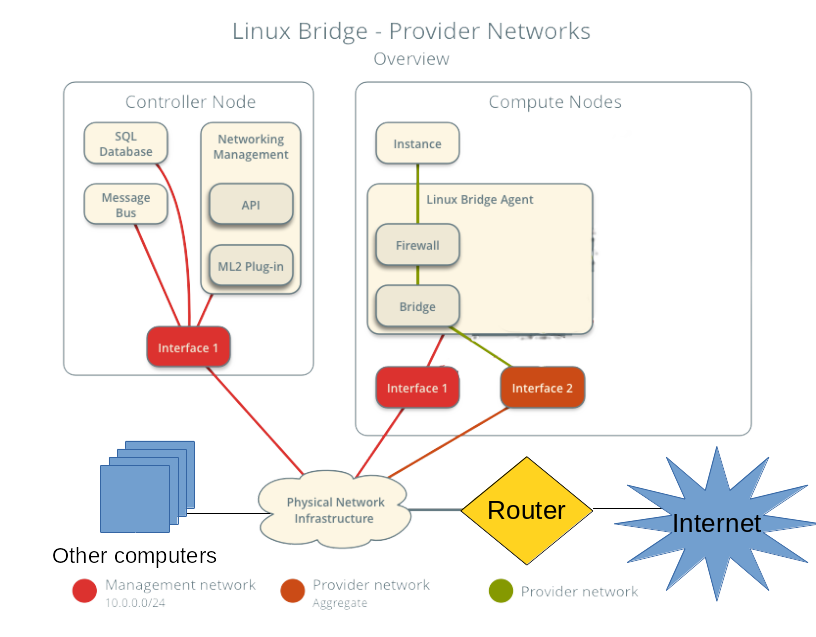
The last service I’m installing from the install guide (I skipped cinder because I’m not using block storage) is Neutron. By far this was the most complicated and most difficult service to install and configure. I had the most problems with neutron and networking in general both during the install phase and also later when I was debugging the operation of the cloud. In the case of Neutron I started by reading the install guide section for neutron like the other services, but I also often needed to read the OpenStack Networking Guide to get a better grasp on the underlying concepts the install guide was trying to explain. Especially after getting to the section in the install guide where it asks you to pick between “Provider Networks” or “Self Service Networking”.
After reading all the documentation I decided that I wanted use provider networks because all I wanted was all my guests on a flat Layer 2 and for the guests to come on my home network with an IP address I could reach from any of my other computer I have at home. When I saw this diagram in the Networking Guide:
 it made my decision simple. This networking topology was exactly what I wanted. I didn’t want to have to deal with creating a network, subnet, and router in neutron for each tenant to be able to access my guests. With this decision made I went about following the configuration guide lke for the previous services.
Unfortunately I hit an issue pretty early on. These were related to Neutron’s default configuration being spread across multiple files. It makes it very confusing to follow the install guide. For example, it says you want to write one set of config options into /etc/neutron/neutron.confthen a second set of config options into /etc/neutron/plugins/ml2/ml2_conf.ini and a third set of config options into /etc/neutron/plugins/ml2/linuxbridge_agent.ini, etc. This process continues for another 2 or 3 config files without any context on how these separate files are used. Then what makes it worse is when you actually go to launch the neutron daemons . Neutron itself consists of 4-5 different daemons running on the controller and compute nodes. But, there is no documentation anywhere on how all of these different config files are leveraged by the different daemons. For example, when launching linuxbridge-agent daemon which config files are you supposed to pass in? I ended up having to cheat for this and look at the devstack soure code to see how it launched neutron there. After that I realized neutron is just leveraging oslo.config‘s ability to specify multiple config files and have them be concatenated together at runtime. This means that because there are no overlapping options that none of this complexity is required and a single neutron.conf could be used for everything. This is something I think we must change in Neutron, because as things are now are just too confusing.
After finally getting everything configured I encountered a number of other issues. The first was around rootwrap, just like nova, neutron need root privileges to perform some operations, and it leverages rootwrap to perform the privilege escalation. However, neutron uses rootwrap as a separate daemon, and calls it over a socket interface. (this is done to reduce the overhead for creating a separate python process on each external call, which can slow things down significantly) When I first started neutron I hit a similar error to nova about sudo permissions. So I needed to create a sudoers file for neutron, in my case it looked like this:
|
1 2 |
neutron ALL=(root) NOPASSWD: /usr/local/bin/neutron-rootwrap /etc/neutron/rootwrap.conf * neutron ALL=(root) NOPASSWD: /usr/local/bin/neutron-rootwrap-daemon /etc/neutron/rootwrap.conf |
But it also turns out I needed to tell neutron how to call rootwrap. I found this bug on launchpad when I did a google search on my error and it told me about the config options I needed to set in addition to creating the sudoers file. These weren’t in the install documentation as I expect by default the neutron distro packages set these config options. After creating the sudoers file and setting the config flags I was able to get past this issue.
The next problem was also fairly cryptic. When I first started neutron after fixing the rootwrap issue I was greeted by this error in the logs:
|
1 2 3 4 5 6 7 8 9 10 11 12 13 14 15 16 17 18 19 20 21 22 23 24 25 26 27 28 29 30 31 32 33 34 35 36 37 38 39 40 41 42 43 44 |
2017-03-30 11:57:05.182 4158 ERROR neutron.plugins.ml2.drivers.agent._common_agent Traceback (most recent call last): 2017-03-30 11:57:05.182 4158 ERROR neutron.plugins.ml2.drivers.agent._common_agent File "/usr/local/lib/python2.7/dist-packages/neutron/plugins/ml2/drivers/agent/_common_agent.py", line 453, in daemon_loop 2017-03-30 11:57:05.182 4158 ERROR neutron.plugins.ml2.drivers.agent._common_agent sync = self.process_network_devices(device_info) 2017-03-30 11:57:05.182 4158 ERROR neutron.plugins.ml2.drivers.agent._common_agent File "/usr/local/lib/python2.7/dist-packages/osprofiler/profiler.py", line 153, in wrapper 2017-03-30 11:57:05.182 4158 ERROR neutron.plugins.ml2.drivers.agent._common_agent return f(*args, **kwargs) 2017-03-30 11:57:05.182 4158 ERROR neutron.plugins.ml2.drivers.agent._common_agent File "/usr/local/lib/python2.7/dist-packages/neutron/plugins/ml2/drivers/agent/_common_agent.py", line 203, in process_network_devices 2017-03-30 11:57:05.182 4158 ERROR neutron.plugins.ml2.drivers.agent._common_agent device_info.get('updated')) 2017-03-30 11:57:05.182 4158 ERROR neutron.plugins.ml2.drivers.agent._common_agent File "/usr/local/lib/python2.7/dist-packages/neutron/agent/securitygroups_rpc.py", line 277, in setup_port_filters 2017-03-30 11:57:05.182 4158 ERROR neutron.plugins.ml2.drivers.agent._common_agent self.prepare_devices_filter(new_devices) 2017-03-30 11:57:05.182 4158 ERROR neutron.plugins.ml2.drivers.agent._common_agent File "/usr/local/lib/python2.7/dist-packages/neutron/agent/securitygroups_rpc.py", line 131, in decorated_function 2017-03-30 11:57:05.182 4158 ERROR neutron.plugins.ml2.drivers.agent._common_agent *args, **kwargs) 2017-03-30 11:57:05.182 4158 ERROR neutron.plugins.ml2.drivers.agent._common_agent File "/usr/local/lib/python2.7/dist-packages/neutron/agent/securitygroups_rpc.py", line 139, in prepare_devices_filter 2017-03-30 11:57:05.182 4158 ERROR neutron.plugins.ml2.drivers.agent._common_agent self._apply_port_filter(device_ids) 2017-03-30 11:57:05.182 4158 ERROR neutron.plugins.ml2.drivers.agent._common_agent File "/usr/local/lib/python2.7/dist-packages/neutron/agent/securitygroups_rpc.py", line 157, in _apply_port_filter 2017-03-30 11:57:05.182 4158 ERROR neutron.plugins.ml2.drivers.agent._common_agent security_groups, security_group_member_ips) 2017-03-30 11:57:05.182 4158 ERROR neutron.plugins.ml2.drivers.agent._common_agent File "/usr/local/lib/python2.7/dist-packages/neutron/agent/securitygroups_rpc.py", line 173, in _update_security_group_info 2017-03-30 11:57:05.182 4158 ERROR neutron.plugins.ml2.drivers.agent._common_agent remote_sg_id, member_ips) 2017-03-30 11:57:05.182 4158 ERROR neutron.plugins.ml2.drivers.agent._common_agent File "/usr/local/lib/python2.7/dist-packages/neutron/agent/linux/iptables_firewall.py", line 163, in update_security_group_members 2017-03-30 11:57:05.182 4158 ERROR neutron.plugins.ml2.drivers.agent._common_agent self._update_ipset_members(sg_id, sg_members) 2017-03-30 11:57:05.182 4158 ERROR neutron.plugins.ml2.drivers.agent._common_agent File "/usr/local/lib/python2.7/dist-packages/neutron/agent/linux/iptables_firewall.py", line 169, in _update_ipset_members 2017-03-30 11:57:05.182 4158 ERROR neutron.plugins.ml2.drivers.agent._common_agent sg_id, ip_version, current_ips) 2017-03-30 11:57:05.182 4158 ERROR neutron.plugins.ml2.drivers.agent._common_agent File "/usr/local/lib/python2.7/dist-packages/neutron/agent/linux/ipset_manager.py", line 83, in set_members 2017-03-30 11:57:05.182 4158 ERROR neutron.plugins.ml2.drivers.agent._common_agent self.set_members_mutate(set_name, ethertype, member_ips) 2017-03-30 11:57:05.182 4158 ERROR neutron.plugins.ml2.drivers.agent._common_agent File "/usr/local/lib/python2.7/dist-packages/oslo_concurrency/lockutils.py", line 271, in inner 2017-03-30 11:57:05.182 4158 ERROR neutron.plugins.ml2.drivers.agent._common_agent return f(*args, **kwargs) 2017-03-30 11:57:05.182 4158 ERROR neutron.plugins.ml2.drivers.agent._common_agent File "/usr/local/lib/python2.7/dist-packages/neutron/agent/linux/ipset_manager.py", line 93, in set_members_mutate 2017-03-30 11:57:05.182 4158 ERROR neutron.plugins.ml2.drivers.agent._common_agent self._create_set(set_name, ethertype) 2017-03-30 11:57:05.182 4158 ERROR neutron.plugins.ml2.drivers.agent._common_agent File "/usr/local/lib/python2.7/dist-packages/neutron/agent/linux/ipset_manager.py", line 139, in _create_set 2017-03-30 11:57:05.182 4158 ERROR neutron.plugins.ml2.drivers.agent._common_agent self._apply(cmd) 2017-03-30 11:57:05.182 4158 ERROR neutron.plugins.ml2.drivers.agent._common_agent File "/usr/local/lib/python2.7/dist-packages/neutron/agent/linux/ipset_manager.py", line 149, in _apply 2017-03-30 11:57:05.182 4158 ERROR neutron.plugins.ml2.drivers.agent._common_agent check_exit_code=fail_on_errors) 2017-03-30 11:57:05.182 4158 ERROR neutron.plugins.ml2.drivers.agent._common_agent File "/usr/local/lib/python2.7/dist-packages/neutron/agent/linux/utils.py", line 128, in execute 2017-03-30 11:57:05.182 4158 ERROR neutron.plugins.ml2.drivers.agent._common_agent execute_rootwrap_daemon(cmd, process_input, addl_env)) 2017-03-30 11:57:05.182 4158 ERROR neutron.plugins.ml2.drivers.agent._common_agent File "/usr/local/lib/python2.7/dist-packages/neutron/agent/linux/utils.py", line 115, in execute_rootwrap_daemon 2017-03-30 11:57:05.182 4158 ERROR neutron.plugins.ml2.drivers.agent._common_agent return client.execute(cmd, process_input) 2017-03-30 11:57:05.182 4158 ERROR neutron.plugins.ml2.drivers.agent._common_agent File "/usr/local/lib/python2.7/dist-packages/oslo_rootwrap/client.py", line 129, in execute 2017-03-30 11:57:05.182 4158 ERROR neutron.plugins.ml2.drivers.agent._common_agent res = proxy.run_one_command(cmd, stdin) 2017-03-30 11:57:05.182 4158 ERROR neutron.plugins.ml2.drivers.agent._common_agent File "<string>", line 2, in run_one_command 2017-03-30 11:57:05.182 4158 ERROR neutron.plugins.ml2.drivers.agent._common_agent File "/usr/lib/python2.7/multiprocessing/managers.py", line 774, in _callmethod 2017-03-30 11:57:05.182 4158 ERROR neutron.plugins.ml2.drivers.agent._common_agent raise convert_to_error(kind, result) 2017-03-30 11:57:05.182 4158 ERROR neutron.plugins.ml2.drivers.agent._common_agent RemoteError: 2017-03-30 11:57:05.182 4158 ERROR neutron.plugins.ml2.drivers.agent._common_agent --------------------------------------------------------------------------- 2017-03-30 11:57:05.182 4158 ERROR neutron.plugins.ml2.drivers.agent._common_agent Unserializable message: ('#ERROR', ValueError('I/O operation on closed file',)) 2017-03-30 11:57:05.182 4158 ERROR neutron.plugins.ml2.drivers.agent._common_agent --------------------------------------------------------------------------- |
Which isn’t helpful at all. It turns out that this error means that neutron can’t find the ipset command, but it’s not at all clear from the traceback. I was only able to figure this out after tracing through the neutron source code (by following the calls in the traceback) I realized that this error is being emitted after neutron calls the rootwrap daemon. I had to turn debug log level on in the separate rootwrap.conf (which is something packaged in the tarball) to get the rootwrap daemon to log the error message it’s encountering, which in this case was that ipset could not be found. After installing ipset this was corrected.
After all of these headaches I finally got neutron running. But, I quickly found that my choice for provider networks was causing issues with DHCP on my home network. I only have a single 24 port unmanaged switch at home and the bridge interfaces for the guests were on the same Layer 2 network as the rest of my home infrastructure, including my DHCP server. This meant that when I created a server in the cloud the DHCP request from the guest would go out and be recieved by both the neutron DHCP agent as well as my home DHCP server because being on the same Layer 2 meant they shared a broadcast domain. Luckily neutron’s default security group rules blocked the DHCP response from my home server, but there was still a lease record being created on my home server. Also if I ever loosened the security group rules and DHCP traffic was allowed then there would be a race condition between my server and the neutron agent. It turns out there was a small note (see step 3) on this potential problem in the networking guide. So my solution for this was to disable DHCP in neutron and also stop running the DHCP agent on my cloud. This had a ripple effect in that I couldn’t use the metadata service either because it depends on DHCP to set the route for the hardcoded ip address for the metadata server. (this will come up later) Luckily I was able to leverage the force_config_drive option in Nova to make sure the metadata service wasn’t necessary.
I modified the network diagram above for what I ended up with in my cloud:
 (note I’m terrible at art, so you can clearly tell where I made changes)
If all of the above didn’t make it clear I still find Neutron the roughest part of the user experience for OpenStack. Besides complexity in configuration it also has a presumption of a decent understanding of networking concepts. I fully admit networking is hard, especially for clouds because you’re dealing with a lot of different pieces, but this is somwhere I feel we need to make improvements. Especially in my use case where my requirements were pretty straightforward. I just wanted to have a server come up on my home network when it was booted so I could log into it right after it booted. In my opinion this is what the majority of cloud consumers (people using the API) care about. Just getting an IP address (v4 or v6 it doesn’t really matter) and being able to connect to that from their personal machines. After going through this process I’m pretty sure that my college student self who had a much more limited understanding of networking than I do now would have had a very difficult time figuring this out.
Booting the first server
After getting everything running on a single node it was time to boot my first server. I eagerly typed in the
|
1 |
openstack server create |
command with all the parameters for my credentials the flavor and the image I had uploaded and waited for the server to go ACTIVE state by running:
|
1 |
openstack server list |
a few times. Once the server went into the ACTIVE state I tried to login into the guest with ssh, and got nothing. The ssh connection just timed out and there wasn’t any indication why. Having debugged a ton of issues like this over the years my first guess was ok I screwed up the networking, let me look at the console log by running:
|
1 |
openstack console log show test-server |
and it returned nothing. I was a bit lost as to why, the console log should show the process of booting the operating system. I figured that I made a configuration mistake in the nova, so to double check I logged into the compute node and checked the libvirt state directory and confirmed that the console log file was empty. But this left me at an impasse, why would the guest not be logging anything to the console on boot? So I just started sanity checking everything I could find. When I looked at Nova’s local image cache and saw the cirros image was 0 bytes in size. A cirros image should be about 13MB in size, so 0 bytes was clearly wrong. From there I started tracing through the glance logs to figure out where the data was getting lost (was it nova downloading the image from glance, or did glance have an empty image) when I found:
|
1 |
DEBUG glance_store._drivers.filesystem [req-3163a1a7-4ca9-47e8-9444-cd8b865055fb 20f283024ffd4bf4841a8d33bdb4f385 6c3fc6392e0c487e85d57afe5a5ab2b7 - default default] Wrote 0 bytes to /var/lib/glance/images/e6735636-43d9-4fb0-a302-f3710386b689 with checksum d41d8cd98f00b204e9800998ecf8427e add /usr/local/lib/python2.7/dist-packages/glance_store/_drivers/filesystem.py:706 |
Which was the only hint I could find in the glance logs. It wasn’t even that useful all it said was that glance wrote 0 bytes to disk for the uploaded image. Which at least confirmed that glance wasn’t storing any data from the image upload. But, I couldn’t find any other information about this. So I decided to re-upload the image to glance and use tcpdump on both my desktop and the server to make sure the data was getting sent over the wire to glance. The output of the tcpdump showed all the data being sent and received. This at least meant that the data is getting to the glance api server, but it didn’t really help me figure out where the data was going.
With no other ideas I decided to “instrument” the glance code by manually adding a bunch of log statements to the installed python code in
|
1 |
/usr/local/lib/python2.7/site-packages/glance |
by hand to the trace the data flow through the glance code to find where the image goes from 13MB to 0 bytes. When I did this I was able to figure out that the image data was being lost outside of the glance code in one of it’s requirement libraries either webob, paste, or something like that. When I saw that I realized that I forgot to use constraints when installing glance. I quickly rushed to reinstall glance from the tarball using the constraints parameter and restarted the service. After doing this and re-uploading the image everything worked!
My only mistake in that process was in my over-eagerness to fix the problem I forgot to take notes of exactly what I reinstalled to see where the actual problem was. So all I can say for sure is that make sure you use constraints whenever you install from source, because clearly there was an issue with just using pip install by itself.
After getting glance working I was able to re-run the openstack command to create a server and this time I was able to get a console log, but ssh still didn’t work.
Networking Woes
At this point I had the servers booting, but I wasn’t able to login to them. I’ve personally had to debug this kind of issues many times, so when I saw this my first step was to ping the IP address for the guest, just to rule out that it was an issue with the ssh daemon on the server. Since the ping didn’t work I wanted to see if there were was an entry in my arp table for the ip address. Again, there was nothing on that IP after running the arp command. So this either meant there was an issue with Layer 2 connectivity to the guest from my desktop, or the guest didn’t know it’s IP address. (I’ve personally seen both failure conditions) My next step was to check the console log to see if it was setting an IP address correctly. When I got to the cloud-init section of the console log it showed that the IP address was never getting assigned. Instead the server was timing out waiting for a DHCP lease. If you remember the neutron section above I had to disable DHCP on the guests because it was conflicting with my home’s DHCP server so this clearly wasn’t right.
It turns out that cloud-init doesn’t know how to deal with static networking configuration from a config drive. (it might work with a metadata server, but I was not able to check this) So when the guest boots it just ignores the static networking information in the config drive and then tries to get a DHCP lease. This meant that cirros, the recommended image for testing and what the install guide tells you to use, wasn’t going to work. Also the majority of cloud images you can download weren’t going to work either. The only cloud image I was able to get working was the official ubuntu cloud image. This was because Nova was doing file injection to write a the networking information directly into the guest file system. I found a useful blog post on this in my searching: http://blog.oddbit.com/2015/06/26/openstack-networking-without-dhcp/ (although the translation didn’t work on RHEL like that post indicates) But, even if I got ubuntu to work, having a cloud that was only able to boot a single type of image isn’t really that useful.
Luckily the OpenStack Infrastructure team has a similar problem on some public OpenStack clouds they run things on, and they created the Glean project to be an alternative for cloud-init that can properly use the static networking information from a config drive. All I had to do was leverage the Disk Image Builder project to create the images I uploaded into my cloud with glean instead of cloud-init. While not ideal solution, because you can’t take anyone’s random pre-existing cloud image, this worked well enough for me because I can remember to do this as the primary user of my cloud.
It’s also worth pointing out that all of these networking issues would have been completely avoided if I chose self service networking back in the setting up neutron section. (because it creates a separate Layer 2 network for each tenant) But, given my goals with the cloud and the way the documentation lays out the options I had no way to know this. This connects back to my earlier complaints with neutron being too complex and presuming too much prior knowledge.
But, at this point I had a working single node cloud and could successfully boot guests. All that was left before I finished the cloud deployment was to replicate the installation on the remaining 4 servers.
Setting Up the Compute Nodes
Once I confirmed to have a working configuration and got all the services figured out on the controller node (which included nova-compute and the necessary neutron services for a compute node because it was an all in one) and got everything running there, it was time to setup the compute nodes. This was pretty straightforward and just involved configuring nova-compute and neutron services. It was pretty formulaic and basically just copy and paste. The exact procedure that I wrote down in my notes for this process was:
- add provider network interface config
- disable apparmor
- reboot
- download tarballs
- create system users
- add nova user to libvirt group
- install all binaries (libvirt, qemu, ipset, mkisofs, libssl-dev, pip)
- make service dirs /etc/ /var/lib for both neutron and nova
- copy etc dirs from tarballs to /etc
- pip install code with upper-constraints
- write config files (basically just copy from another compute node)
- set permissions on /etc and /var/lib
- create sudoers files for nova and neutron
- create systemd unit files
- start services
- run nova discover_hosts
This is basically just copying and pasting things across the remaining 4 servers. But there were a couple of lessons I learned from the initial install were reflected in these. The only one I haven’t talked about before was disabling apparmor. (or SELinux on other linux distros) I learned the hard way that the default apparmor rules on Ubuntu prevent nova and libvirt from doing the necessary operations to boot a guest. The proper way to fix this issue (especially for better security) would be to create your own apparmor rules to allow the operations being blocked. But, I have always been confused by this, especially on SELinux and didn’t even bother trying. I just disabled apparmor and moved on.
After repeating these steps across the 4 compute nodes I had a fully operational cloud. Nova was showing me the full capacity of 80 vCPUs and I could interact with the cloud and launch guests across all of them. My project was complete! (at least for the first phase)
Conclusion
So after writing all of this down I came to the realization that I likely give the impression that installing OpenStack by hand is an impossibly complex task. But, honestly it wasn’t that bad of an experience. Sure, OpenStack is complex software with a lot of moving pieces, but in total I got everything working in 2-3 days. (and I wasn’t dedicating all my time during those days either) The majority of the issues that I hit were caused solely by my insistence on installing everything from tarballs. If I actually followed my original thought experiment and just followed the install guide the only issue I probably would have hit was with networking. Once you understand what OpenStack is doing under the covers the install is pretty straightforward. After doing my first OpenStack install a few years ago I found I had a better understanding of how OpenStack works which really helped me in my work on the project. It’s something I recommend that everyone does at least once if they’re planning on working on OpenStack in any capacity. Even just in a VM for playing around. (devstack doesn’t count)
For comparison that rack of similar Dell servers I deployed back in college took me so much longer to get running. In that case I used xCAT for deployment automation. But, it still took me over a month to get the inifiband cards working with RDMA using OFED, setting up SLURM for MPI job scheduling, connecting everything to our central LDAP server, and having users able to launch jobs across all the nodes. While, it’s not entirely a fair comparison since I have almost a decade more of experience now, but I think it helps put into perspective that this is far from the most grueling experience I’ve had installing software.
After going through the whole exercise I don’t actually run this cloud 24/7, mostly because it heats up my apartment too much and I can’t sleep at night when it’s running. The power consumption for the servers is also pretty high and I don’t really want to pay the power bill. This basically means I failed the second half of the experiment, to virtualize my home infrastructure. Since I can’t rely on the cloud for critical infrastructure if it’s not always running. But I have found some uses for the cloud both for development tasks as well as running some highly parallel CPU tasks across the entire cloud at once.
Moving forward I intend to continue working on the cloud and upgrading it to future releases as they occur. Also one of my goals for this entire exercise was going back to the OpenStack community with feedback on how to improve things and submitting patches and/or bugs on fixing some of the issues. This will be an ongoing process as I find time to work on them and also encounter more issues.
An excellent read! (The second half of the talk was too; I’m disappointed I had a conflict and had to miss the first part of it.)
As for cloud-init and configdrive, it’s worth noting that it _should_ be supported according to the fine manual:
http://cloudinit.readthedocs.io/en/latest/topics/datasources/configdrive.html
Granted, if memory serves this support was added somewhat recently so may not be present in the packaged versions you trying to use.
Thanks!
Yeah, I saw that in the cloud-init docs too. I’m not exactly sure which versions of cloud-init were on the 2 or 3 different images I tried. But, it definitely didn’t work for any of the images I tried that used cloud-init. I’ll try manually building a couple different images with the latest version of cloud-init to see if that works.
I did some follow up investigation, the latest version 0.7.9 of cloud-init works on the fedora 26 cloud base image for OpenStack (found here: https://alt.fedoraproject.org/cloud/ ) However, every other image I tried with an older version didn’t work. Including the latest fedora 25 cloud image which was built with the previous cloud-init version 0.7.8. So I’m gonna conclude that you need the latest version to get it working.
0.7.9 was released in Dec 2016: https://launchpad.net/cloud-init/trunk/0.7.9 so the majority of the images you find out there probably don’t have it. (at least for right now)
Nice read … gives a good learning experience to people new to Openstack
Great reading! I think that official OpenStack docs should include such a good explanation for a simple use case.
Regarding the provider network and DHCP issue, I’m not sure why did you bring down both of the DHCP servers from your network? Having such a simple use-case, cloud user should be able to take advantage of existing DHCP server, so that new VMs and existing devices can share the same network.
I agree being able to leverage my existing DHCP infrastructure would be ideal. But, from my understanding the issue with that is then neutron/nova is not ever made aware of the IP address assigned to the VMs from my external DHCP server. So the API will not have the correct IP address for the VMs. There might be a way to solve this in neutron, but I wasn’t able to find a way reading the docs.