After I came home from a recent trip that happened to occur during the middle of a heat wave. I arrived to find my apartment quite too hot, it was at least 45 C inside. Needless to say it wasn’t the most comfortable way to come home after 15 days out of town. Especially given that it took several hours for my in-wall AC units to cool the apartment down. After this I decided it was time for me to do something about it to address this issue.
I had been listening to some of my friends tell me about their home automation setups for a while, but I really never saw the point for myself. Living in a small one bedroom apartment where I don’t have any sensors, networked appliances, and only have 2 in wall AC units I figured there was nothing I could really automate. But, after thinking about it and talking to a few people I came to the conclusion could use it to solve my apartment temperature issues.
I would essentially need to create my own thermostat, in other words something that can read the current temperature of my apartment and the adjust the AC based on that. That sounds like the same basic premise behind home automation, so it seemed like a good fit for me.
Hardware
So knowing that I needed to have some way to control the AC I took a close look at my AC units and started thinking about how I could remotely control them. My first inclination was to tap into the existing controls with a microcontroller (or Raspberry Pi) and plug that into my home network. The AC only has analog controls (a rotary switch and a pot) so it would actually be very easy to tap into that. But the biggest problem with doing this is that I actually do not own the AC units, they were included with the apartment so I decided I probably shouldn’t take them apart as I might end up having to buy them when I left. (which I definitely didn’t want) The other small problem was that I actually do not have any model information on them, I only know they’re made by GE.
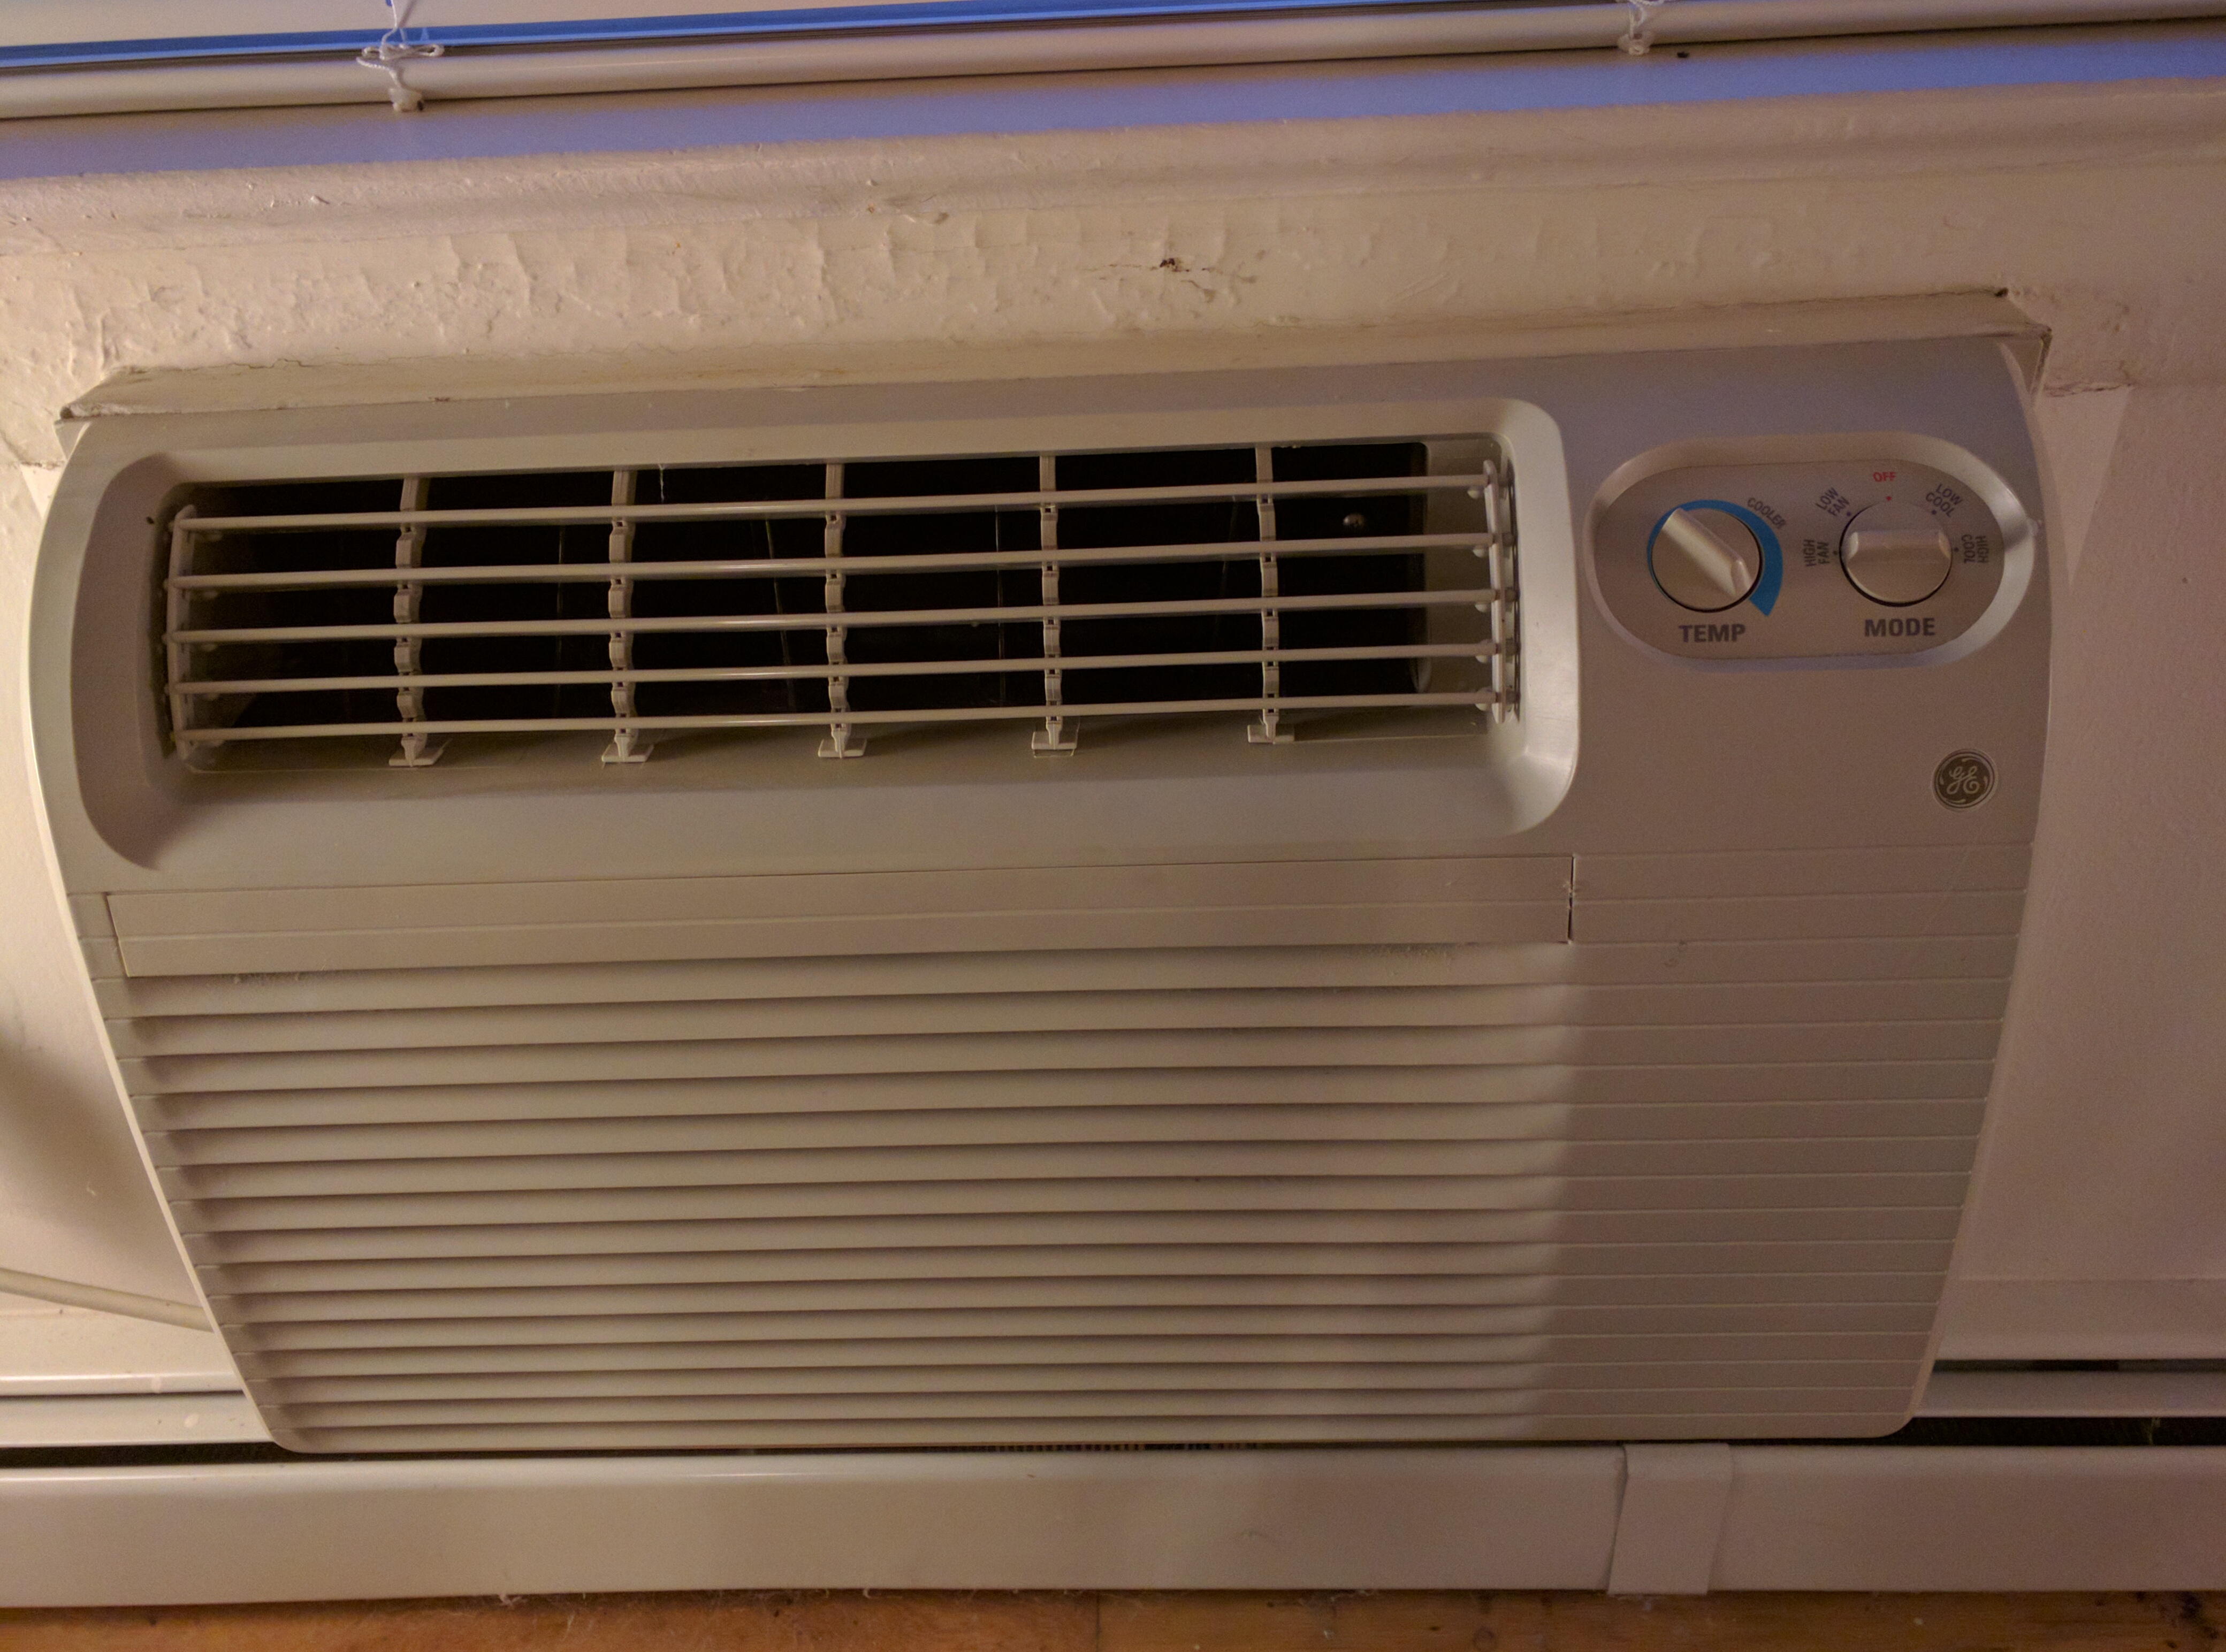
At one point I did try to take the front cover off to see if there was a model or serial number under there, But when I did that I accidentally pulled the unit out of the wall, so the mystery remains.
With that route ruled out I instead decided to start looking for a way to control the power into the AC. Instead of using the AC unit’s controls to turn it on or off, I would instead turn the power on or off at the wall. I would lose the flexibility of remotely controlling the fan speed, but this seemed like it was a fair compromise.
I started looking at the options for remotely controllable power switches. There are a lot of different options out there for IoT like wireless communication protocols, but the most popular 2 choices seemed to be Z-Wave and ZigBee. I actually used ZigBee devices as part of my senior design project in college and it was real pain to deal with them, so I wanted to avoid using it again. After doing some reading online it also looked like Z-Wave devices have a much more consistent and cohesive ecosystem which made it easier to use. My only hesitation with that was the specification and hardware was not open. But, there was is an open source library for interacting with Z-Wave networks, OpenZWave with python bindings too:
https://github.com/OpenZWave/python-openzwave
While not perfect, it was still enough for what I needed. It also seemed to be fairly well supported by home-assistant which was the software package I was going to be using. So I went ahead and ordered a USB Z-Wave controller, 2x Z-Wave enabled power switches, and a Z-Wave multi-sensor which I would use primarily for the included temperature sensor. With devices ordered I moved on to get to getting the software setup.
Home Assistant
As I mentioned previously early on I decided to use home-assistant for the software side. There were a couple of reasons for this, first I know a bunch of people who either use it, hack on it occasionally, or both. It is also all written in Python 3 which makes it very convenient for me to read the code and contribute to since I do almost all my programming in python nowadays. It also has an active community that has been responsive and helpful in my experience:
https://github.com/home-assistant/home-assistant
I decided to run home-assistant on one of my existing servers that is already on 24/7. The resources required for it are fairly limited, so I setup a python3 virtualenv and installed home-assistant into it. I then started reading through the getting started guide and the components list and started configuring home-assistant. I really like that everything is in yaml, it’s a way of doing things that I’m very familiar with and it made the on-boarding time a lot faster for me. But I can imagine for new users not familiar with the yaml syntax having a more difficult time.
There is a lot of detailed information out there on setting up home-assistant so I won’t dive into the details. My only complaint with the configuration process and the official documentation is that some of the fields you’re setting aren’t very well described or defined, and some of the more advanced logic is just skipped over (although it is often documented in another place) So I had to do a bit of jumping around to actually figure out how to configure some components.
After my Z-Wave components arrived I also worked on integrating those into my home-assistant instance. It was actually fairly easy, and just involved removing the USB controller and putting it and the device you’re adding to the Z-Wave network into discovery mode until the controller blinks to acknowledge the pairing was successful. Then when you plug it back into your computer and restart home-assistant it will see all the devices you added.
After I got everything setup I ended up with 3 groups of devices with 1 group representing a different room in my apartment. As of when I first got everything setup the groups were broken up by:
The living room group contains:
- The AC unit’s power switch (which also included sensors for power, current, voltage, etc.)
- The multisensor (which include a bunch of sensors, temperature, humidity, light, motion, etc.)
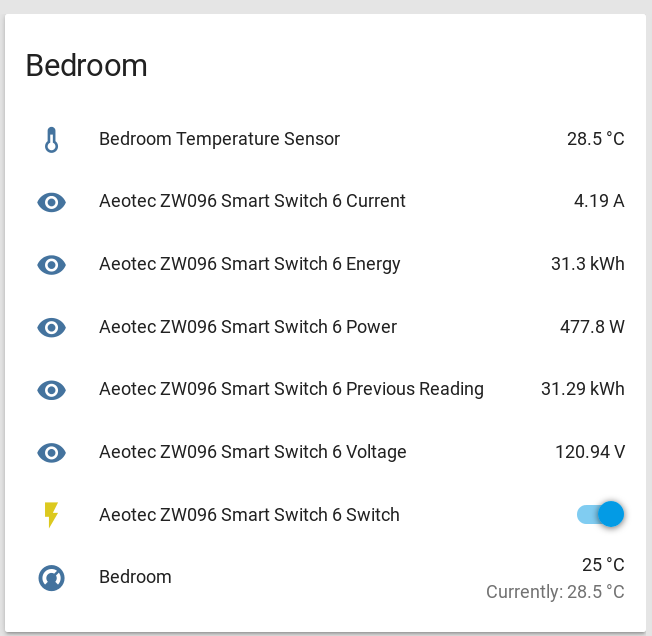
The bedroom group just contains the power switch and it’s associated sensor
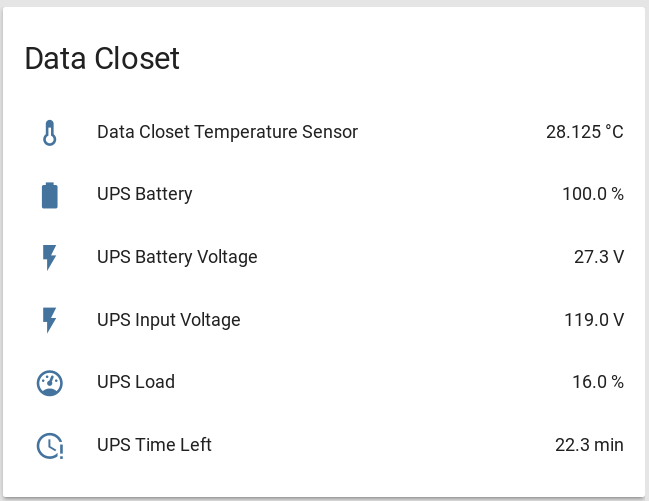
The “Data Closet” group represents my bedroom’s closet which is also where I keep a couple servers and all my networking equipment. I had this group contain all the sensors from my UPS which includes:
- Line voltage
- Battery voltage
- Battery charge percentage
- UPS load
- UPS Time Left
First Attempt at automation
With everything installed and talking to each other I was able to start my first attempt at writing some automation. I read the home-assistant docs on writing automation rules and wrote a bunch of rules like this::
|
1 2 3 4 5 6 7 8 9 10 11 12 13 14 15 16 17 |
alias: 'Turn on Living Room AC when Home and above 25 C' trigger: platform: numeric_state entity_id: sensor.aeotec_zw100_multisensor_6_temperature_4 above: 25 condition: - condition: state entity_id: device_tracker.my_phone state: 'home' - condition: state entity_id: switch.aeotec_zw096_smart_switch_6_switch_2 state: 'off' for: minutes: 20 action: service: switch.turn_on entity_id: switch.aeotec_zw096_smart_switch_6_switch_2 |
which is basically just saying turn the living room ac unit on if the temperature is above 25 C and given the condtions that I’m home, and the AC has been off for at least 20min. All these rules essentially were the settings I would want to program a thermostat with if I had one. I used this for a couple of days, but I was finding that things weren’t being triggered very reliably. After consulting the docs again I couldn’t figure out why. So I dove into the home-assistant code. It turns out the reason why is that numeric_state triggers are only edge triggered. So the rules I was writing would only work if the temperature went above or below the threshold temperature and all the conditions were met at that time. If a condition was not met then the rule wouldn’t be triggered again until the ac went across the threshold in the same direction again. (in other words it dropped below 25 and then when it went above 25 again)
This left me in an odd place as the approach I had originally envisioned wouldn’t work. But I didn’t get too discouraged, knowing what the problem was I went back to the home-assistant source code to see how hard it would be to implement a non-edge triggered state. That is when I came across the ideal solution.
Using the software thermostat
It turns out that home-assistant already had a component to do exactly what I was attempting to do. The heat_control thermost module:
https://home-assistant.io/components/thermostat.heat_control/
was written to provide people with a “thermostat” when they have a temperature sensor and a plug-in heater. This enabled people to set a temperature and have the heater turn on until it reach the desired temperature.
This module would work perfectly for my use cases, the only issue with it was that it was written for space heaters. I quickly threw together a patch to correct this though:
https://github.com/home-assistant/home-assistant/pull/2719
which added a config option to treat the switch as an AC (or any cooling device) instead of a heater. After locally installing my patch and re-configuring home-assistant I was able to essentially have a thermostat. Now I had a nice little thermostat icon in my living room group on the home-assistant dashboard:

This lets me set a target temperature for my rooms and home-assistant will turn the AC on to cool it down and when it’s reached the target temperature it will turn the AC off. After I added the new thermostat devices I wrote some basic time based automation rules like:
|
1 2 3 4 5 6 7 8 9 10 11 12 |
alias: Set Living Room AC to 30 C when asleep trigger: platform: time after: '12:30:00' condition: - condition: time before: '09:30:00' action: service: thermostat.set_temperature entity_id: thermostat.living_room data: temperature: 28 |
Which sets the living room AC to a much higher temperature at night after I’ve likely moved to the bedroom to get ready to go to sleep. This is basically the same functionality that a regular programmable thermostat provides you.
Multiple zones
At this point I had a pretty cool setup, home-assistant was acting like a real thermostat and I could set a comfortable temperature. The one thing that I wasn’t happy with was that I only had 1 temperature sensor in the living room and that was being used to control both the bedroom and the living room AC. I could have just ordered another one of those Z-Wave multi-sensors. My issue with that was they’re kind of expensive and overkill for what I needed. I also wanted 2 different readings one in my bedroom, and one in my bedroom’s closet where I keep all my servers and networking gear. That is when I remembered I had a spare Raspberry Pi 2 just sitting in my closet. So I decided to leverage that and get a couple temperature sensors wired into and use that as my data source for the bedroom.
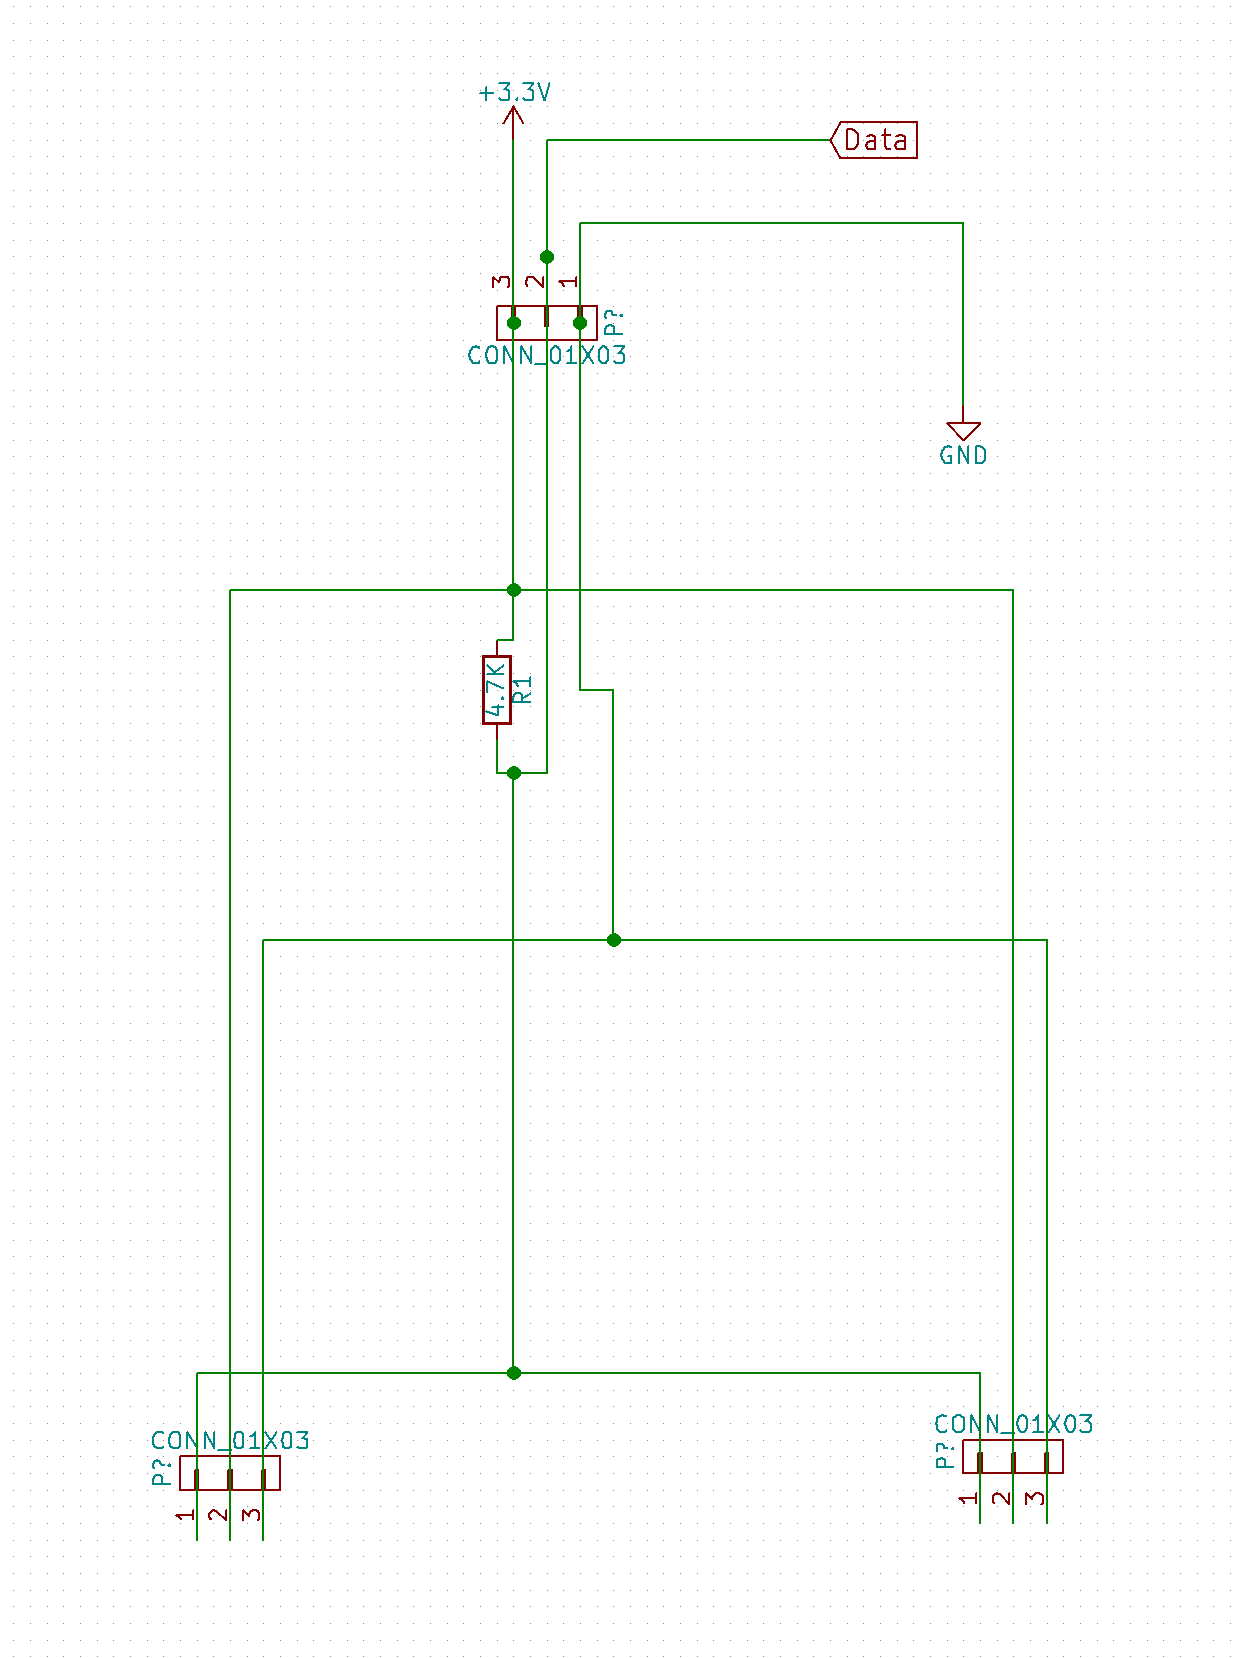
After doing some reading online about my options, I decided on using a Dallas 1 wire temperature sensor, the DS18B20 which seems to be extremely popular with the Raspberry Pi crowd. (it was also a good choice because I played a little bit with the Dallas 1-wire protocol in college) After I got my sensors delivered I wired things up:

The nice thing with 1 wire sensors is you just need to connect everything in parallel on the same data bus. All the devices are individually addressed. So that daughter board just wires the 2 sensors in parallel. (with a pull-up resistor)
 With things connected to my raspberry pi 2 I now had an interface to query to get the temperature in my bedroom (and my “data closet”) But I needed a good interface for getting that data into home assistant. This led me to leverage the existing MQTT infrastructure I setup as part of the initial home-assistant install and I wrote:
https://github.com/mtreinish/dallasMQTT
which enabled me to periodically publish results from an arbitrary number of dallas 1 wire temperature. I also wrote that daemon with all the groundwork setup to enable different classes of sensors to be used in the future. Although, for right now it just supports the 1 wire temperature sensors. After I get this setup I was able to add the MQTT sensors (using the MQTT sensor component) to my home-assistant config and then reconfigured the bedroom thermostat to use the new sensor. So now I have 2 individually controllable thermostat zones and temperature readings for my closet and bedroom.
Cycle Times
It turns out there was one more problem I would hit before things were in good working order. After living with the AC being controlled by the for a couple of days I found that it was short cycling. In other words as soon as the room hit the desired temperature it would cycle the power on the switch immediately, this resulted in the AC being on for only about 2-4 minutes at a time (and off for about the same)
The thing about AC units is that they’re at there most efficient at steady state, and much less efficient for the first few minutes after you turn them on, so what the way this was behaving was far from ideal. I needed to add a bit of hysteresis to the system, so that I wasn’t constantly cycling the power on my AC units. Normally a thermostat does this in 2 ways, by adding a bit of a fudge factor around the set temperature. So instead of switching at exactly the set temperature it waits until it passes it by a couple degrees. They also often a defined maximum switching frequency which sets an upper bound on how frequently it will cycle the AC (or heat) on in a room. This was lacking from the heat_control module though.
To accomplish the same thing in home assistant I pushed out:
https://github.com/home-assistant/home-assistant/pull/2726
which added an option to set the maximum switching frequency component. Although, the new option is for setting the minimum cycle duration which I think makes it a bit clearer to people rather than describing it as the hysteresis value or making it actually a frequency, which you’d likely want to express in µHz since normally you are dealing with frequencies of once per several minutes. I might also contribute a patch to enable making the fudge factor around the set temperature configurable, but for right now the new option seems to be working great.
With this option I now can set a how frequently home-assistant will cycle the power on my ACs. Right now I have it set to 20min., mostly because that seemed like a sane starting point. I’ll probably end up adjusting that overtime especially because everything is metered now so I can try and figure out when the AC units are at peak efficiency. If I knew what model units I had I’d hopefully be able to pull up a datasheet on them and figure this out just from that. So right now I’m stuck with trial and error, and slowly optimizing the value over time.
New Automation Rules
With the system now working as I wanted it was time to get a have a bit more fun with it and expand on the basic thermostat functionality. One of the biggest advantages using something like home-assistant provides you is that it gives you a central location for all of your connected devices. This enables to use them in conjunction for whatever purpose you have in mind. Whether it be automation rules, combine actions, etc. So in this particular case I can use any of the pieces of sensor input or state that I have configured to write rules to set the temperature automatically. For example, I used OwnTracks and my router to let home-assistant know where I am (well my phone really) at any give point. I can use this to write rules like:
|
1 2 3 4 5 6 7 8 9 10 11 12 |
alias: Set Living Room AC to 26 C when leaving Starbucks route 9 trigger: platform: state entity_id: device_tracker.my_phone from: 'Starbucks Route 9' action: - delay: minutes: 5 - service: thermostat.set_temperature entity_id: thermostat.living_room data: temperature: 26 |
This rule basically says that 5 minutes (which is to account for the time it takes me to drive home) after I leave one of the local starbucks in the area set the temperature to 26 C. Essentially this rule is to start cooling down my apartment after I leave starbucks and am headed home. I have similar rules that automatically set the target temperature to a higher value when I leave my apartment and a bunch of other rules that use various changes in location to trigger setting different temperatures.
It’s in doing things like this that I can really see a lot of potential. For example if I had window sensors I could program the AC not to ever turn on if the window was open. Or if I had solar power I could adjust the thermostat setting based on my power generation for the day to minimize cost. (in other words set it cooler when the solar cells generate more power) Which was actually something I suggested to my parents as a potential application for them, as they recently had solar panels installed.
Next Steps
For the most part I’m happy with the system I’ve got right now. There are still a few quirks to sort out, like the power switches don’t give real time voltage, current, or power readings. Instead they only report when home-assistant first starts up. Eventually I’d like to get more sensors and more smart devices and use them to create even more sophisticated rules.
How awesome would it be if when I go to start watching a movie if the lights automatically dimmed (or turned off) and the blinds closed themselves. Or if I leave the country and forgot to lock my front door if it would automatically lock for me. But, those are all future things and require additional investment in more hardware, for right now I’m just happy that I won’t be coming home to a really hot apartment anytime soon.